Recently, I have had the desire to try my hand at winding toroids. They have always been a mystery to me. Today’s project is winding a toroid for 40-10 meters. My target antenna is one I learned from Thomas, K4SWL. It is a random wire antenna that is 29.5 long with a 17 foot counterpoise. It is a great antenna and works well at park campsites. I either string it up in a tree or I use my 20′ B&M fishing pole https://kk4z.com/2022/05/11/vertical-antenna-support/.
The antenna as pictured above (battery not included), weighs about 3 oz. The antenna while broadbanded can present higher SWR on some frequencies which can reduce transmit power. I decided to try a 9:1 UnUn to see if I can smooth that out. For instructions on how to wind the toroid I used QRP Guys mini unun. I was going to buy their kit, but they were out of stock at the time of this article. Max power is probably about 10 watts.
The form factor I borrowed from OM0ET. His instructions were not that clear but I liked the way it looked. Winding the toroid was probably the most difficult part. I didn’t have 3 different colored magnetic wires, so I had to pay close attention to how they were wound. I little trial and error and this is what I got.
Partially assembled, it looks like this.
Fully assembled it looks like this. I added an optional rope loop to take the strain off of the UnUn.
In use, the antenna is connected to the brass screw. Either a counterpoise or a 20′ or better length of coax connected to your radio can be used. To run a counterpoise which I prefer, you add a BNC Tee connector.
Your coax cable to your radio is connected to the other side of the tee. The counterpoise is made using a crimp style BNC connector. DO NOT use the center pin in the connector or it will short the antenna.
The other end of the counterpoise has an an eye so it can still be used with the old style configuration. I added a little shrink tubing to help with strain relief.
Here is the complete kit.
Weight is under 4 oz. which is less than a 1 oz gain over the old antenna. How does it play? Initial testing with an antenna analyzer showed SWR’s below 3:1. However, this was done quickly with the antenna more horizontal than vertical. It was a hot sunny day and it was time to get inside. This next weekend I have an activation planned and will wring the antenna out, but so far it looks very promising.
Today’s dalliance is UnUns. An UnUn which stands for Unbalanced to Unbalanced is a transformer of sorts which in this case matches or attempts to match the impedance between an antenna and a transceiver. Today I am making a 9:1 ratio UnUn which is suppose to match a 450 ohm antenna to a 50 ohm transceiver. When the impedance is matched between a transceiver and an antenna, maximum power from the transceiver can be transmitted to the antenna. A 9:1 UnUn is used with random wires and a counterpoise. I call this UnUn QRO because it is rated at 250 watts. I would use this in the field with a radio like my IC-7300 even though I rarely go above 50 watts. I went QRO because this is my first turn at winding a toroid and I thought starting with something larger would be easier.
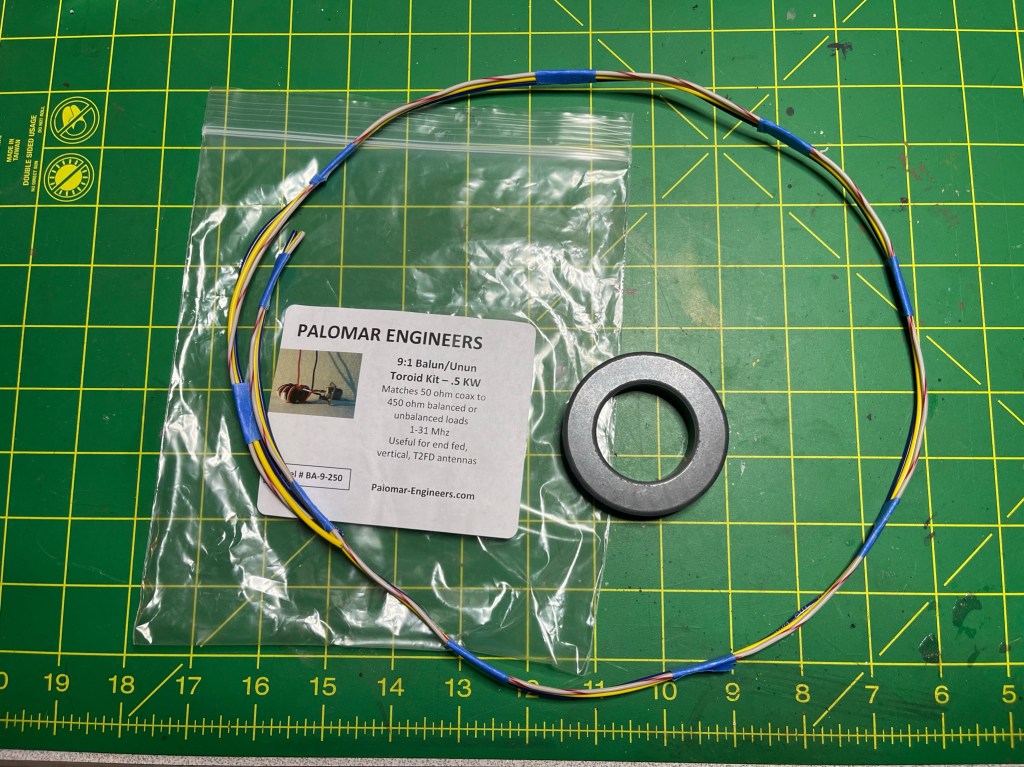
I will only list project specific parts. The toroid kit come from Palomar Engineers https://tinyurl.com/3tkctj2e. This gives you the toroid, wires and instructions. The other project specific part is the case which came from amazon https://tinyurl.com/2p93h9r5 Everything else is generic parts that I either had on hand, purchased locally or from amazon.
The Palomar Kit looks like this.
The kit comes with decent instructions but, with a couple of caveats. One, the wire that comes with the kit appears to be random. The colors of the wires, do not match the colors in the instructions. this is not insurmountable, just makes things a little more difficult especially for first timers like me. The second nit is the pictures provided, while of decent quality, are black and white. In today’s world, color photos should not be that big of deal. The kit can be wired as a BalUn or UnUn. The way I overcame the mentioned shortcomings was to annotate the schematic they provided.
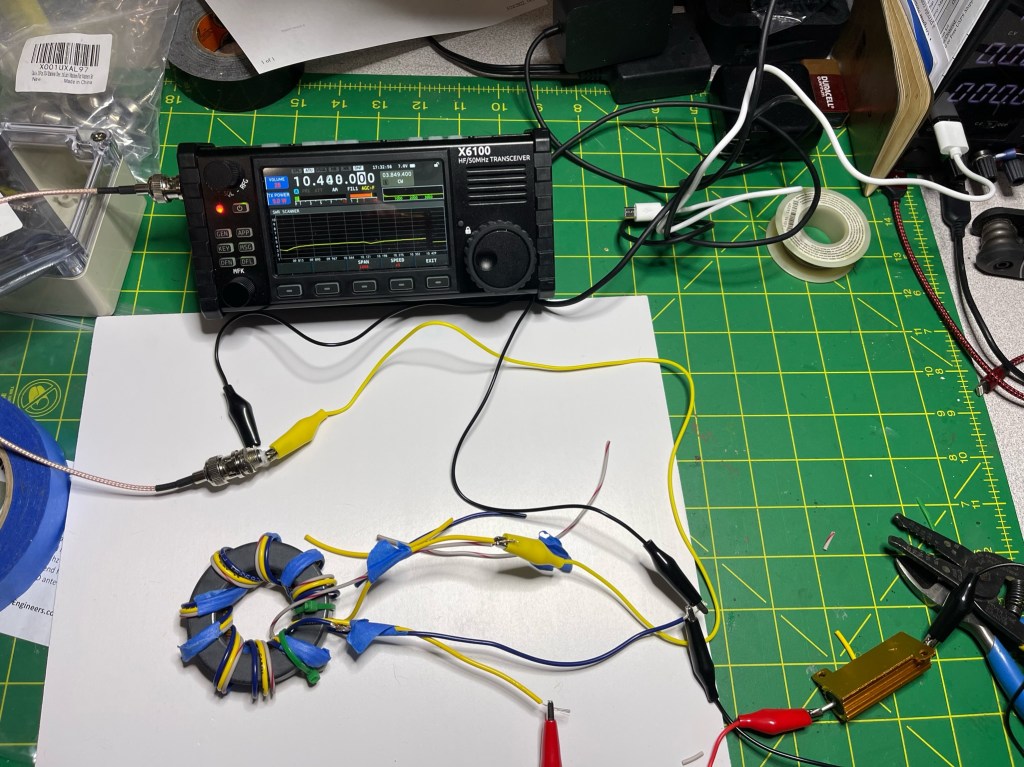
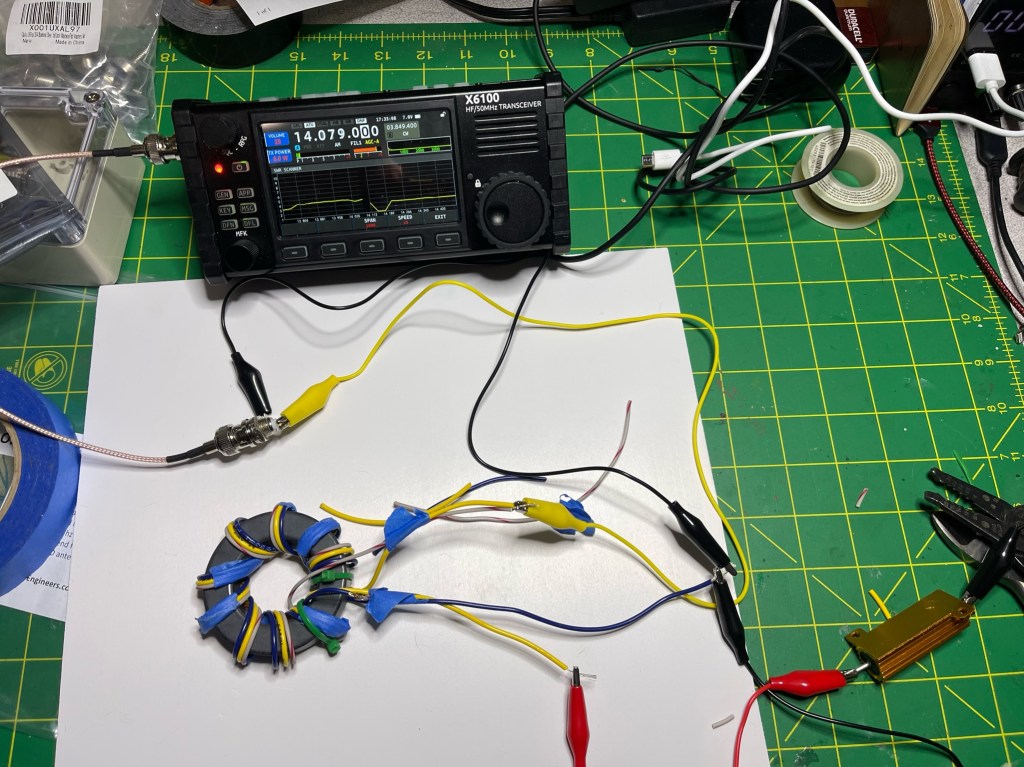
The UnUn is the schematic on the right. According to the instructions, the 3 wires are wound 10 times or turns with each pass of the wires through the center of the toroid counting as one turn. The wound toroid looks like this.
Before I went any further, I tested the toroid. I did this by hooking up a 450 ohm 50 watt resister to the antenna and counterpoise leads and attached my Xiegu X6100 to the input of the UnUn. I then used the SWR Sweep function on the X6100. I knew this wouldn’t be an exact science since I was using a 12″ RG-316 cable and 12″ jumpers, but should be close enough to see if I am in the ball park. Here are a couple of the test.
Shown are 160 meters, 30 meters, and 20 meters with all showing an SWR of ~3:1 or less. Not too shabby. With a random antenna wire of around 49 feet and a 25 foot counterpoise, I expect the SWR to even be less. That means anything from 160- 20 are well within the capability of most tuners. I suspect that I may be able to get down to 10 meters once I hook it up to a real antenna.
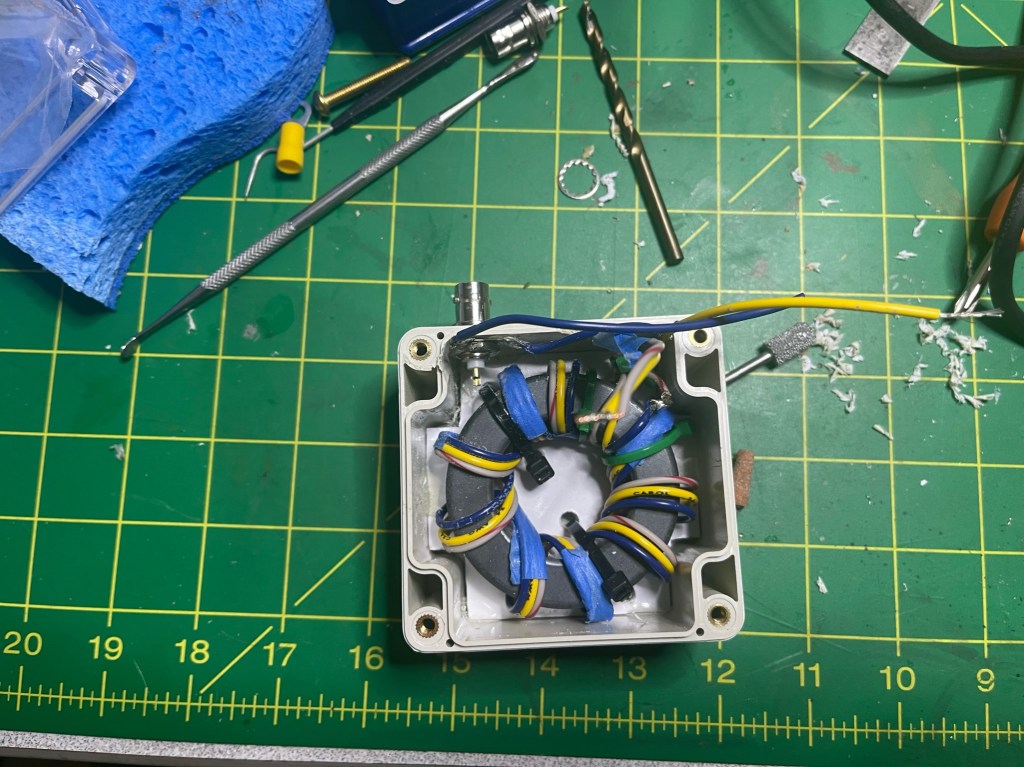
The case was a guess on my part, but as it turns out, it was the right size.
Then all put together, it looks like this. The toroid is mounted on a sheet of plastic and glued into the case.
The input connector is BNC and the screws are 10-32. I have some 10-32 wingnuts on the way to make it easier to attach wires. The eyebolt was to help take some of the strain off of the antenna wire and BNC connector is on the bottom to help protect it from the weather. One final test.
This was a fun little project and gave me some experience and confidence making UnUns. My next project will be a QRP UnUn. I mostly operate QRP when out in the field (max 10 watts. I know). However, some of the stuff I bring is QRO rated. I am trying to reduce the load. Making antenna parts that are QRP rated instead of QRO rated, reduces weight and space. Right now I am doing POTA activations, but hopefully this fall when the ticks and chiggers die off, I will try my hand at SOTA. 72 de Scott
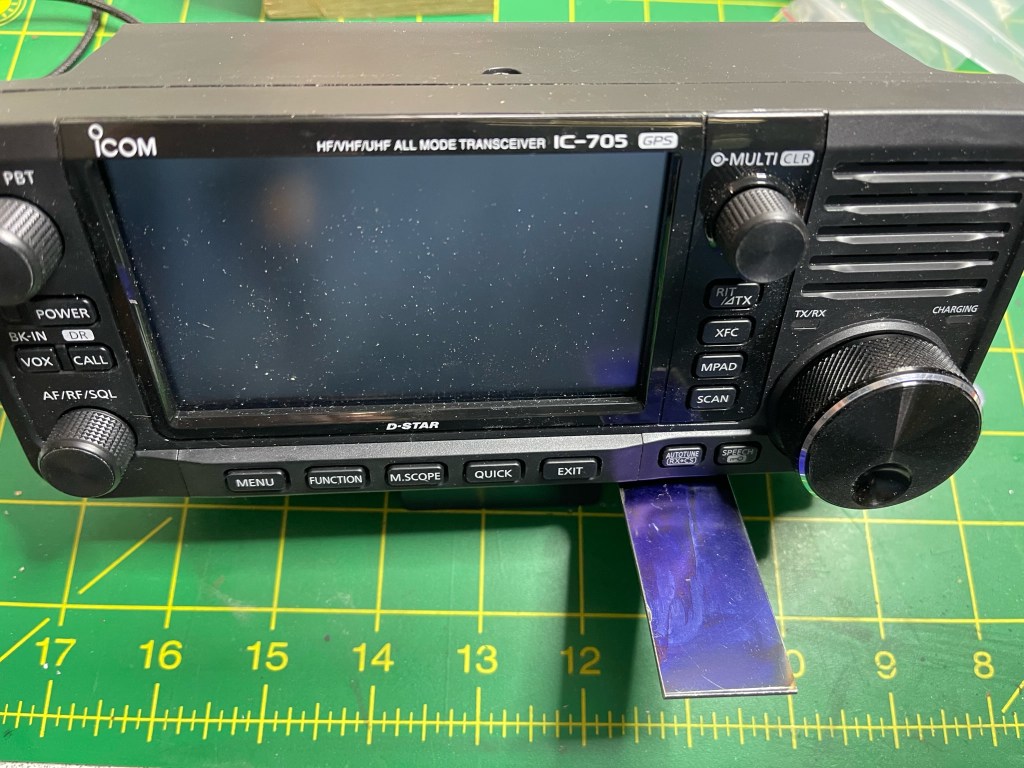
I kinda like the idea of being able to mount your paddle to your radio when operating portable. You can use the weight of the radio to help prevent the paddles from moving around and it frees your off hand for other tasks. We see examples of this with the Elecraft KX series of radios and there are some adapters for radios such as the Yaesu Ft-817/818.
I really like my IC-705. It is probably my best radio for POTA/potable operation. I think the only time I would leave it home is if weight became a problem or I needed to exercise one of my other radios. Recently, Begali came out with a mount to attach their Adventure paddle to the IC-705. It is a sweet set-up; however, the approx. $400 USD price tag got me looking for other alternatives. I have nothing against Begali, I own three of their paddles, and they are superb instruments. I think I wanted to tinker, and this gave me a good excuse.
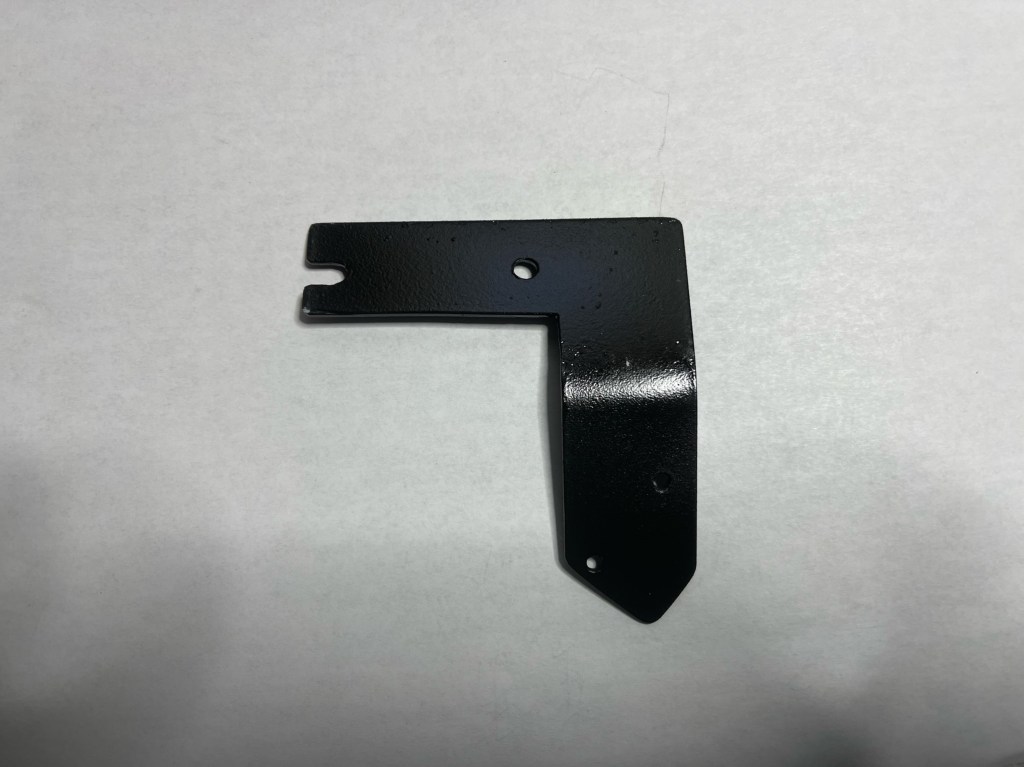
For paddles, I have a set of Larry’s (N0SA) SOTA paddles. I love these paddles. When I go on an activation/Portable Operation, I bring these and my Begali Travelers. If I was going to do a SOTA activation, I would just bring Larry’s Paddles. Next was a trip to Tractor Supply Company (TSC) for a sheet of 16 ga. Steel. That set me back $16. I cut it to 3″ by 3 1/2″ using a cutoff wheel on my grinder.
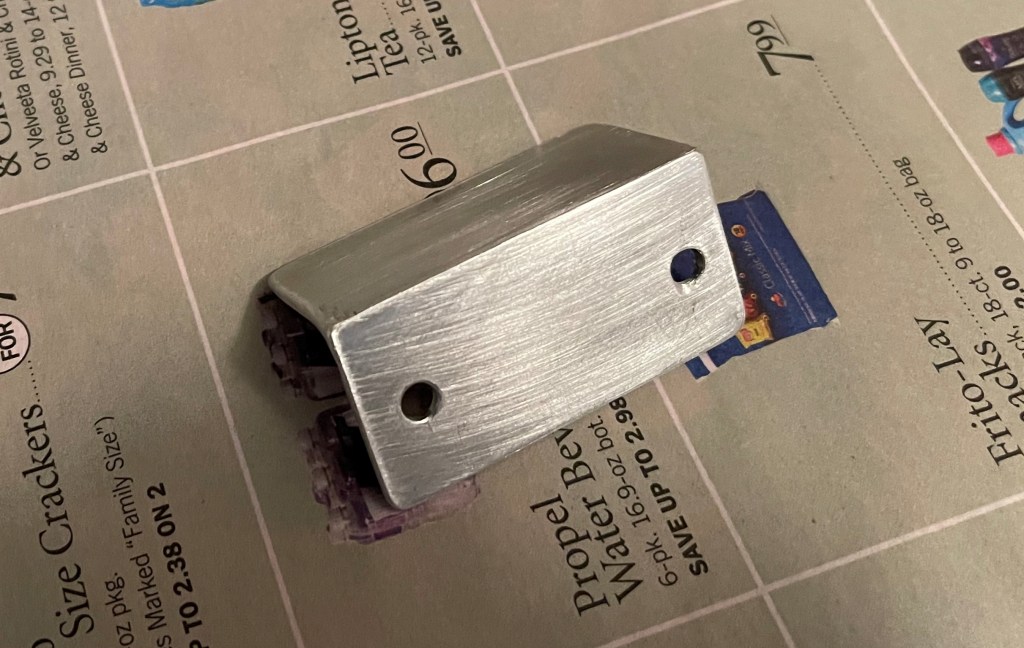
I already have a stand I made out of 1″ x 1″ angle aluminum so I cut this to fit behind it.
The blue on the metal is Dykem Blue which is a layout fluid. In creating this project, I am only using hand tools. Power tools consisted of a grinder with a cut-off wheel. a hand drill, and my trusty Dremel tool. Here is a picture of me giving the mount a rough finish with a file.
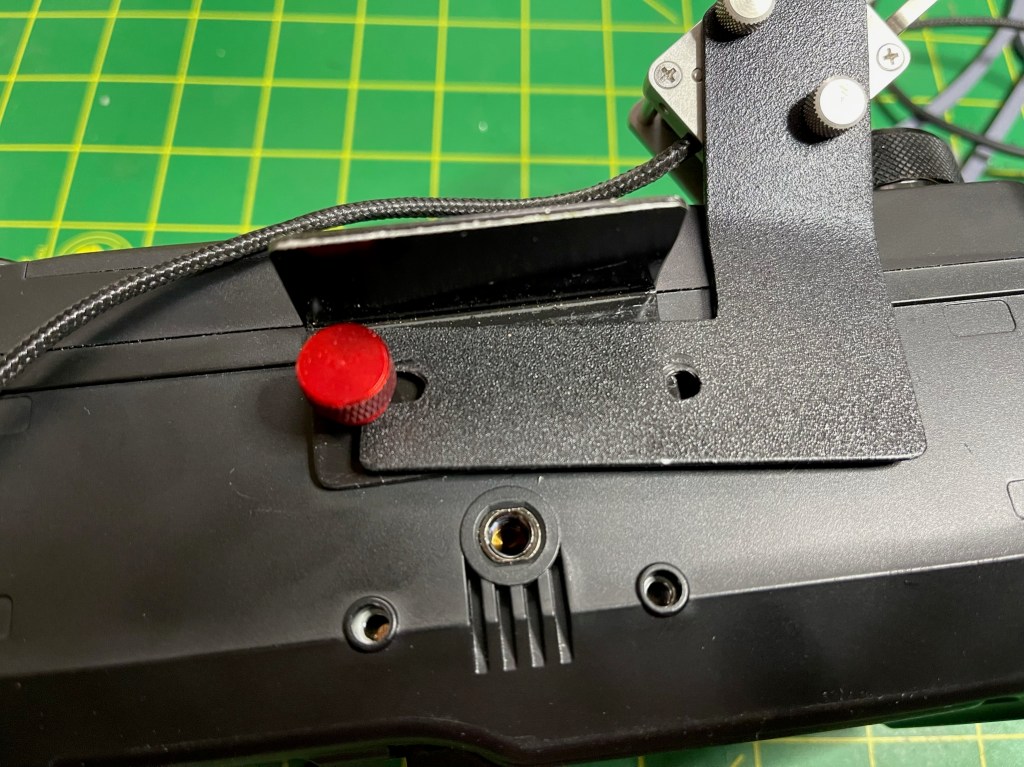
My next step was to install the mount on the radio. I left the tail that will hold the paddles a little long to see where I wanted the paddles.
I am right handed so I mounted the paddle to the right of the radio. As a child, I broke my right wrist and lost a little range of movement so for me, I cannot use a paddle straight on. I found an angle of about 40 degrees to be about right. I also bent the mount down a bit to get the paddles close to level.
I turned one of the machine screw holes into a slot. That way I only have to remove one screw to install and remove the mount.
Next is a coat of primer, followed by a coat of flat black. I also added a clear coat to increase the durability of the finish.
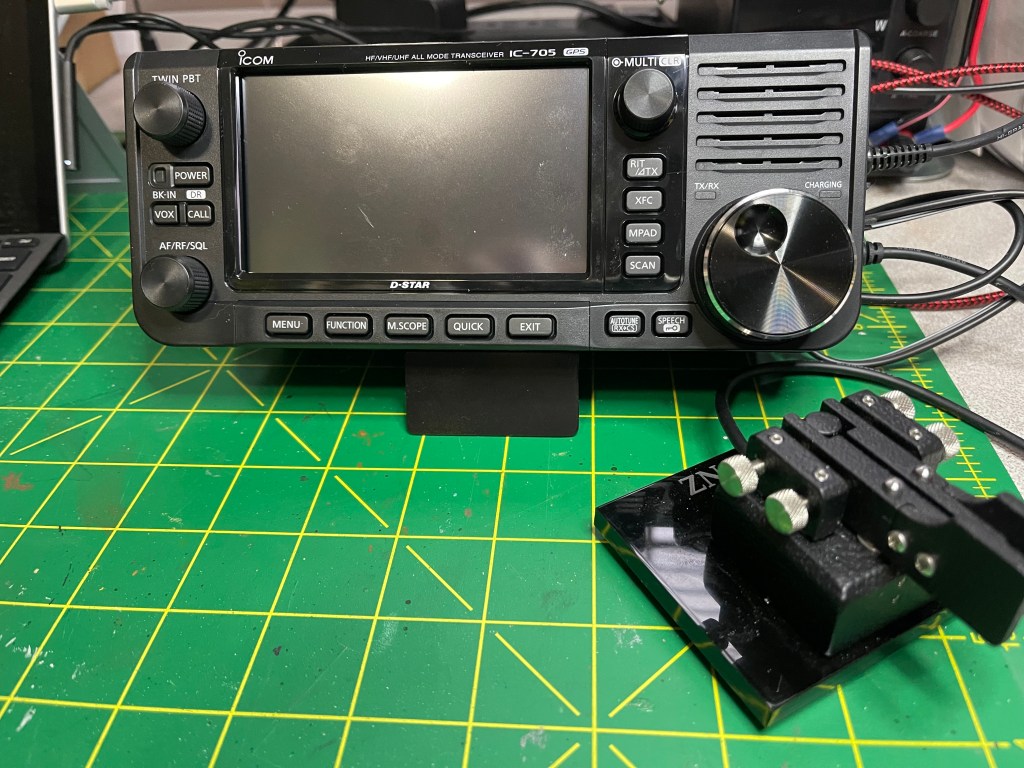
Here is the finished product installed on the radio with the paddles.
The screws that hold the paddle to the mount are #4-40 x 1/4″. I am going to change the hex head bolts that hold the tilt stand/paddle mount to the radio with M4 x 10mm knurled head bolts so I can remove/install without tools. The mount itself weighs in at about 1 ounce.
This was a fun little project. The radio could move around on a smooth surface so something like a silicone mat would cure that, but on something like a wood picnic table it should be just fine. Except for the sheet metal this was built using whatever I had around the house. How does it play…
UPDATE
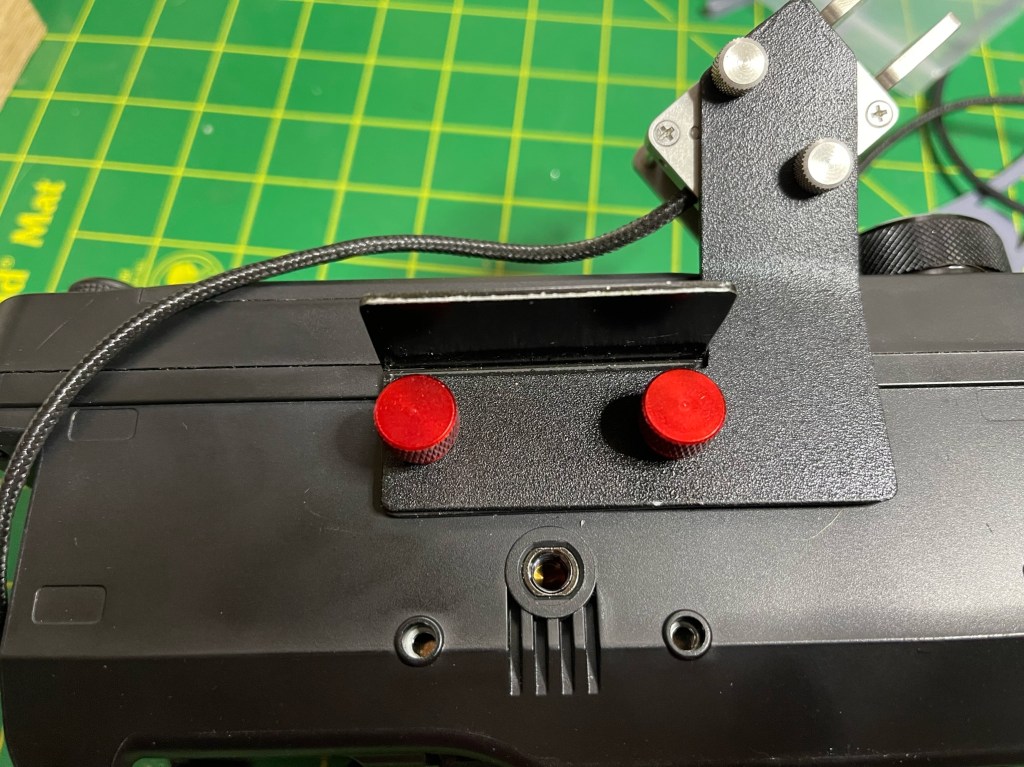
I got the final pieces in the mail. One thing I tried was to mount the paddles on the top of the mount. This also works very well and may even be better in some cases. The only button that the paddles get in the way of is the autotune button. It can still be reached fairly easily.
I also replaced the hex head bolts with knurled head bolts so I can install/uninstall the mount without tools. I got them in red, just in case I drop one. As you can see I only have to completely remove one bolt and loosen the other to remove the paddle mount. This allow the tilt stand to remain with the radio.
The bolts will tighten down with either one or both pieces; however, I only snug them down. That’s the completed project and overall I am pleased with the results. Next field trip is in a couple of weeks. 73 Scott
I like to tinker. Always have and probably, always will. This past weekend while I was activating K-2171, I swapped out antennas to see if one was any better than another. My first antenna was my Frankentenna set up as a vertical. Later in my activation, I switched to my random wire vertical. To use this antenna, I had to shoot a line up into a tree. Band conditions were not that good, and truth be told, I am not sure which antenna was better; however, for this activation, I gave a slight edge to the random wire.
For those that have operated within State Parks, rules and regulations sometimes seem to get a little blurry when it come to operating amateur radio within park boundaries. There is a general consensus that Park Rangers do not like things in their trees. I personally have not had this issue, but I was never approached by a ranger. I operate CW with earbuds on, so I do not really attract attention to myself.
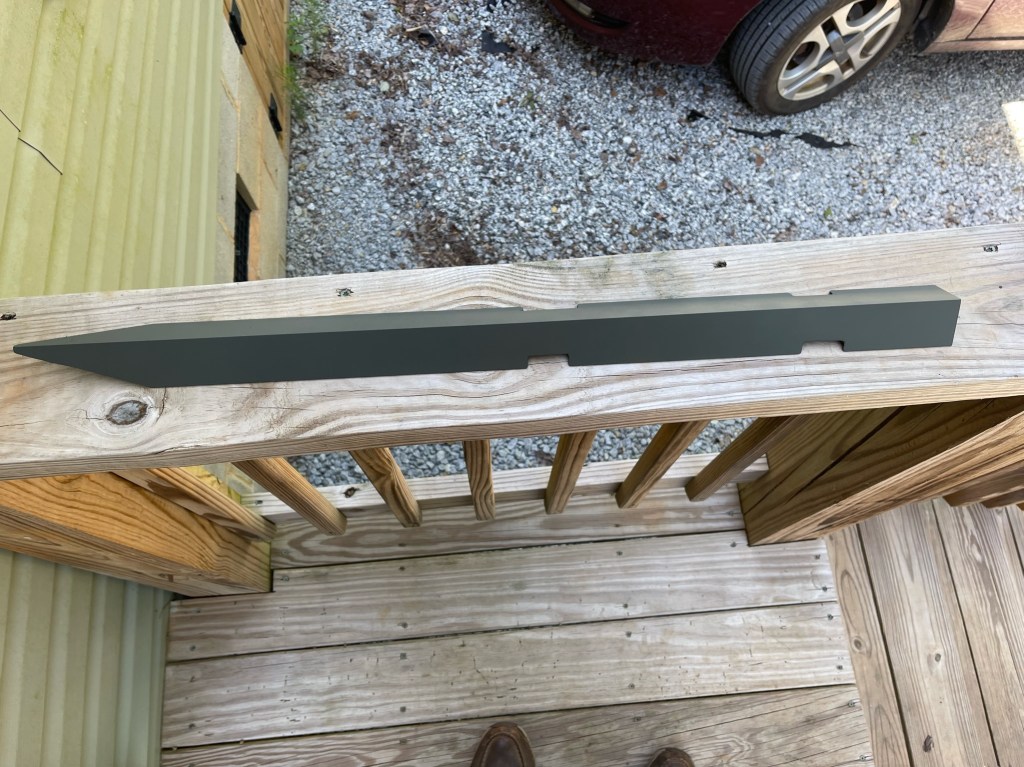
Recognizing, that it might be a matter of time before I get “caught” with something up in a tree, I thought I would look for a solution to solve a potential problem. I have a B&M Black Widow 20′ fishing pole that should work just fine for my random wire antenna. A trip to TSC got me a 4 foot piece of 1 1/2″ x 1 1/2″ Aluminum Angle Stock. Tools used were:
Layout was pretty simple. The angle for the pointy end was 20 degrees and the slots for the straps were 3/8″ by 1 1/4″ (approx). The total length of the stake is 28″
I got everything cut out and deburred. I added a coat of zinc chromate primer and a finish coat of flat olive paint.
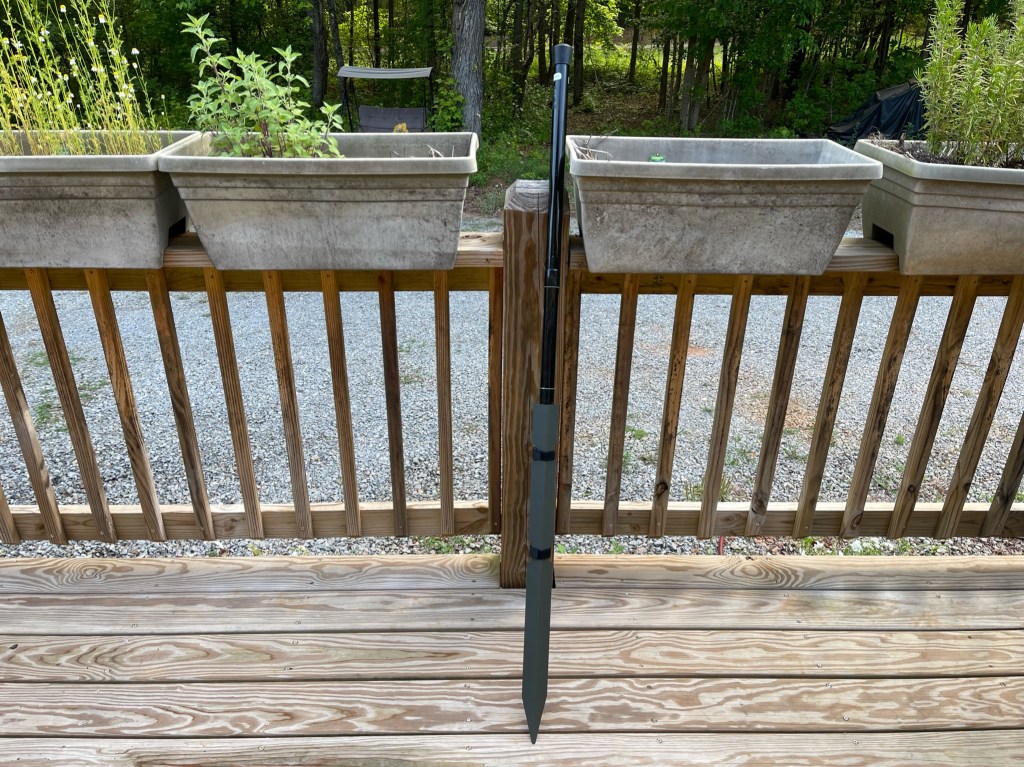
I have two small Velcro straps that I had lying around that work perfectly,
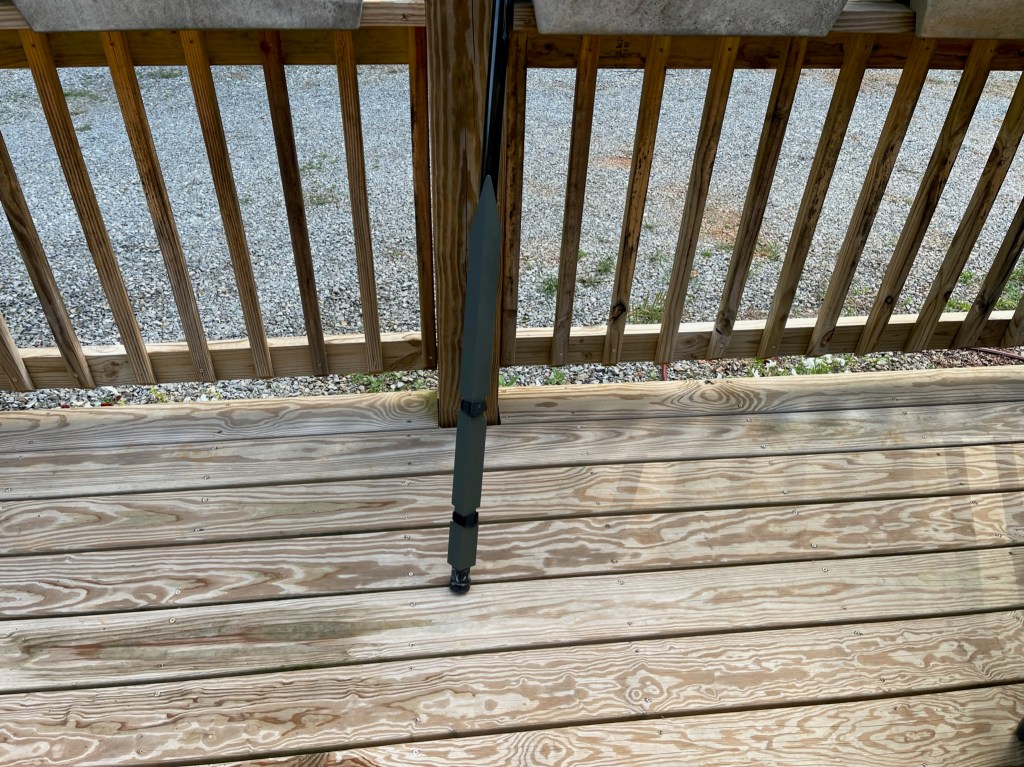
Then by turning the stake around, it stores nicely on the fishing pole. Together the outfit weighs a touch over 1 1/2 pounds. This is easy to carry and by moving the stake more to the center, it would be better balanced for walking.
This gives you options. You should be able to use this anywhere you can drive a tent stake into the ground. With this setup, you can use many different antennas besides a vertical. I am going to try it with my 40m OCF dipole (I may have to mount it a little down from the tip).
When I do an activation, I like to carry a minimum amount of gear. Sometimes, I feel my Frankentenna is too big even though it fits in a small Buddipole bag. It is fun trying to operate with a small amount of gear. For my next activation, I will bring the pole with everything else fitting in an 8 liter Bucket Boss bag. Instead of the Bucket Boss Bag, I could use a small backpack. In fact, I am thinking about doing a couple of SOTA activations this year. I hope to hear you out there! de Scott KK4Z
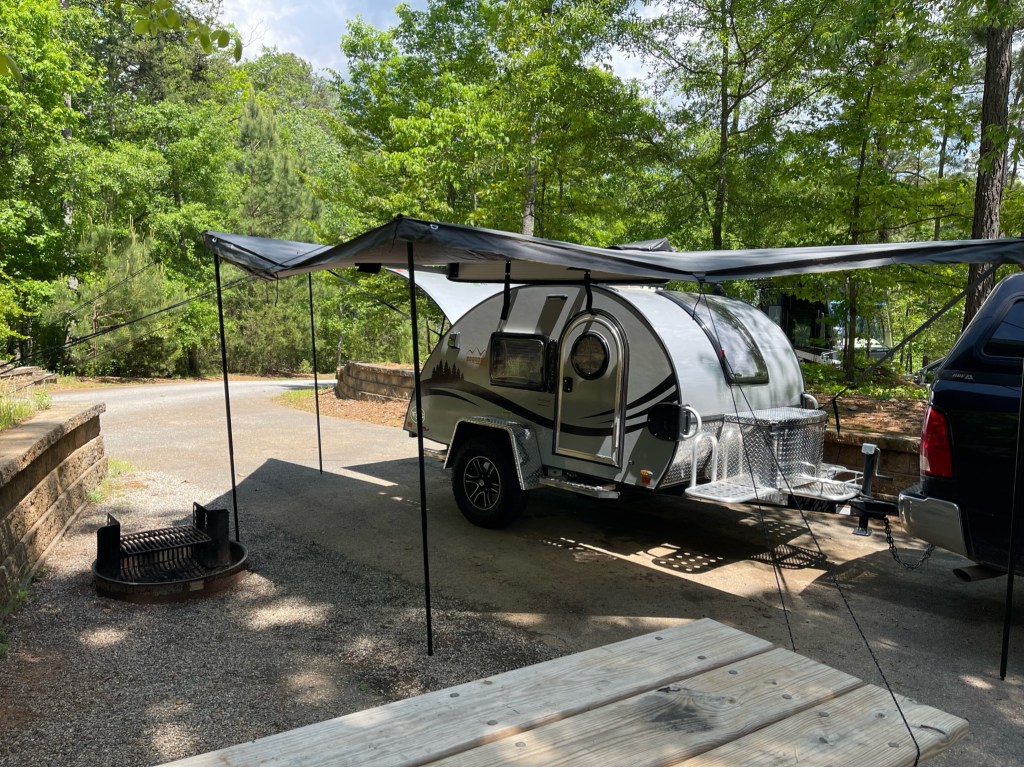
This past Saturday (05-07) was the Georgia POTA Meetup. It was held at Don Carter State Park (K-2171). The park is about a 2 hour drive so I decided to take my new teardrop camper out on its inaugural run. I drove up on Friday. One of the reason for purchasing the camper was to extend my POTA activation range. The camper is made by NuCamp and so far I am pretty impressed with it. It pulls well behind my pickup truck and I only lose about 1/2 mile a gallon for gas. Set up was easy. Since I didn’t disconnect the trailer from the truck, I was set up and good to go in about 15 minutes. Here is a shot of the camper set up.
The camper next door told me some strong winds and possibly a storm were coming so I added some additional guying to the awning. There were no problems.
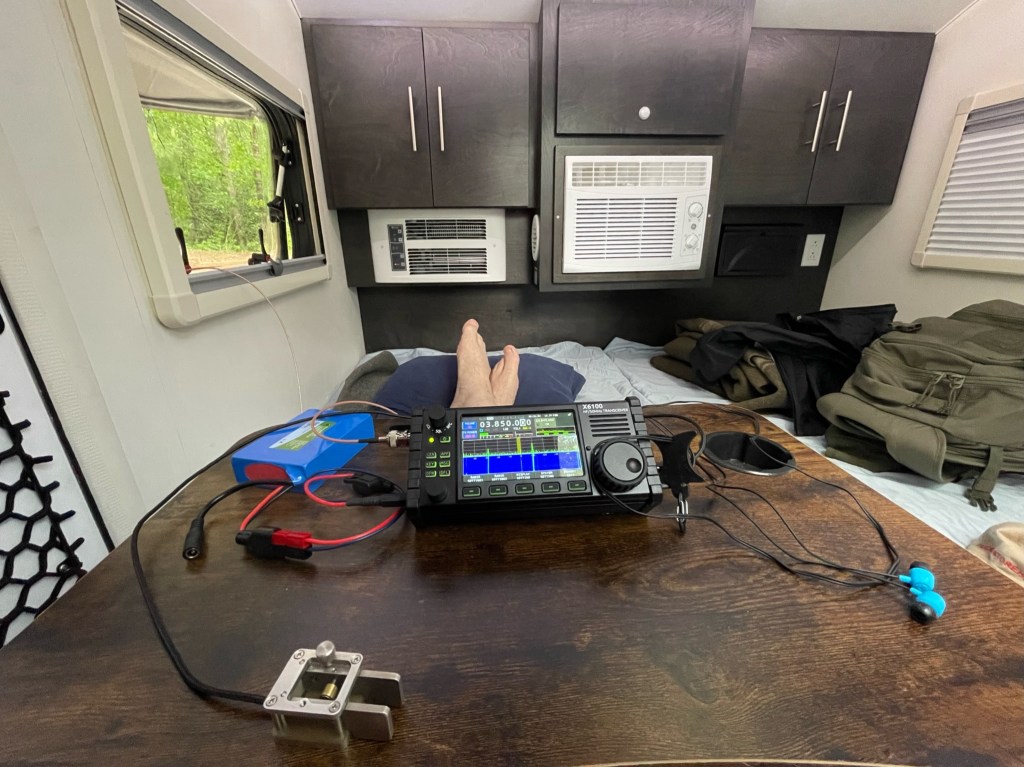
Friday was a rather chilly day and because of the winds I did not set out my folding chairs and table until Saturday. I brought two radios and a couple of antennas with me. Traveling QRP doesn’t take up a lot of space even if you bring a couple of each. I wasn’t sure I was going to make enough contacts on Friday since I started late but I gave it a go anyhow. The first radio up was my Xeigu X6100 and I hooked it up to Chameleon Micro on a spike with a Buddipole 12 foot fiberglass antenna and two aluminum extensions. I also ran a counterpoise. I was only able to make 5 contacts Friday evening, furthest being Colorado. Band conditions were not that good from this location. The Reverse Beacon Network (RBN) didn’t even pick me up. I did start outside.
I worked this way for a little while until the temperature dropped and I started seeing chiggers on the table. I move the operation inside. I wanted to see how well I could operate from inside the camper.
The answer was quite well. I bought a lap desk for this purpose and I was quite comfortable. For logging, I used the Hamrs App on my phone. This was the first time I did logging solely from my phone. Band conditions were still not very good, so I spent most of the time hunting P2P. It was fun, doing a search and pounce while operating CW QRPish (10 watts).
How does the X6100 play? First let me describe the environment. I was in a a RV camping area that was mostly full. There were a lot of big trailers loaded with all sorts of electronic devices, switching power supplies, and whatnot. I was also down in an RF “hole”. The X6100 is fun to use and the display is top notch. Most of the controls are fairly intuitive. I had no problems operating CW and did use the memories. It does have its nits. As others have said, the receiver does overload rather easily, and while I can still work stations, I felt I may have missed some because of the added noise. Along with that, the audio is also rather harsh. While at a park, I often wear ear buds to be respectful of my neighbors. The audio can become tiresome. Adjusting the RF Gain helps. The last real nit was the Digital Noise Reduction. It needs work. Turning it on even at the lowest setting is way too much. Hopefully they will fix this in future firmware updates. The digital filters on the other hand are very good, almost on par with Icom. I did run the radio with a Bioenno 3AH battery so I could have 10 watts. There is a lot to like about this radio. You get a lot of goodness for the money, and Xeigu so far has been good about updating the firmware. When I use this radio again, it will be in quieter RF environments. such as, less popular parks, National Forests, Wildlife management Area, and SOTA. It really is a fun radio to use.
Saturday morning, I walked over to the GA POTA meeting up. It was about a mile and gave me the opportunity to get a little exercise in. There were about about 20 or so people there and they had a couple of stations set up. They also had the special event callsign W4P. It was good to meet fellow POTA operators and have a chance to chat with them. They served hamburgers and hotdogs along with chips, soda and condiments. After a few hours of chatting and a couple of hamburgers, I decided to head back to the camper and see if I could complete my activation for the day.
When I got back I broke out the X6100 again and used it for a while. Not having a lot of luck, I switched over to my IC-705. Yes it is a much better radio and it is more refined, and it does cost twice as much. The X6100 is an excellent value at its price point. I set the 705 up with the AH-705 tuner. I really like the AH-705, as is very versatile, much like its big brother, the AH-4.
One nice thing about the Icom, is it works just like my other Icom radios. Easy to remember. The paddles du jour are my N0SA SOTA paddles. They are one of my favorites. With the better receiver and audio on the Icom, I made a few more contacts, but still not what I was expecting. QRP antennas can be light and small so it is nothing to bring a few along. I decided to swap out antennas. I took down my Chameleon/Buddipole antenna and put up my K4SWL 28 foot vertical with counterpoise. It is a homebrew antenna, but I got the idea from Thomas Witherspoon K4SWL. After putting this antenna up, I continued to slowly add contacts to my log. My method was simple. If I could hear them fairly well, I figured they could hear me, so I tried to work them. There were plenty of stations on the POTA spot page that I did not hear at all. By the end of the day, got enough contacts for an activation on Saturday. Here is a map:
Wrapping up and lessons learned. First, I had a lot of fun both at the meetup and at the campsite. I enjoyed taking up my camper for its first go. Everything worked except for the heater. I may have to bring it back to the dealer, but I had plenty of blankets. I am already planning a trip for next month.
Radios. If I am going to do a drive up POTA activation, my first choice will be the IC-705/AH-705. I like the X6100, its fun to use, and I imagine as time goes on it will get better. The X6100 will do well in quieter RF environments. I haven’t given up on it yet as I think there is still a lot of potential there.
Antennas. I had a surprise here. When weight is not a problem, I bring my my Frankentenna which is a mixture of Chameleon and Buddipole parts. On Saturday, when I switched from my Frankentenna to my K4SWL Random Wire antenna, it was on par and maybe even a little better than the former. The idea of carrying less on an activation has endeared itself to me. I can fit everything I need in a small 8 Liter Bucket Boss Bag https://tinyurl.com/3mwbk95r.
The important part is to get out and have fun. So pack those radios up, 10 watts or 100 watts SSB or CW, drive or walk, around the corner or around the world. I hope to work you and if I have, thanks for the contact. de KK4Z
Welcome to my little corner of the blogosphere. Here you can find some of my adventures in amateur radio. I like to operate from home as well as in the field. I have developed a renewed interest in CW which I have come to enjoy immensely. I also like to putter around and make things for my hobbies. Most of my stuff is made with hand tools found in the average home and none of it is commercial or furniture-grade quality. Sometimes I try things as a “proof of concept”; however, if it works okay — well okay, I use it. Stop by, and enjoy the website. Nothing here is monetized. I share my stuff in hopes of spurring readers into action with their own ideas. I go under the premise “If I can do it, so can you.” If you’re a ham, I hope to hear you on the air and if not, I will tell you this has been a wonderful hobby and service for 25+ years. 73 – Scott.
My amateur radio club, West Georgia Amateur Radio Society (WGARS) decided to participate in Winter Field Day. We are going to operate from Talladega National Forest in Alabama. It doesn’t take much to get me out in the woods with a radio. As a club, we will be operating QRP and I will be doing CW.
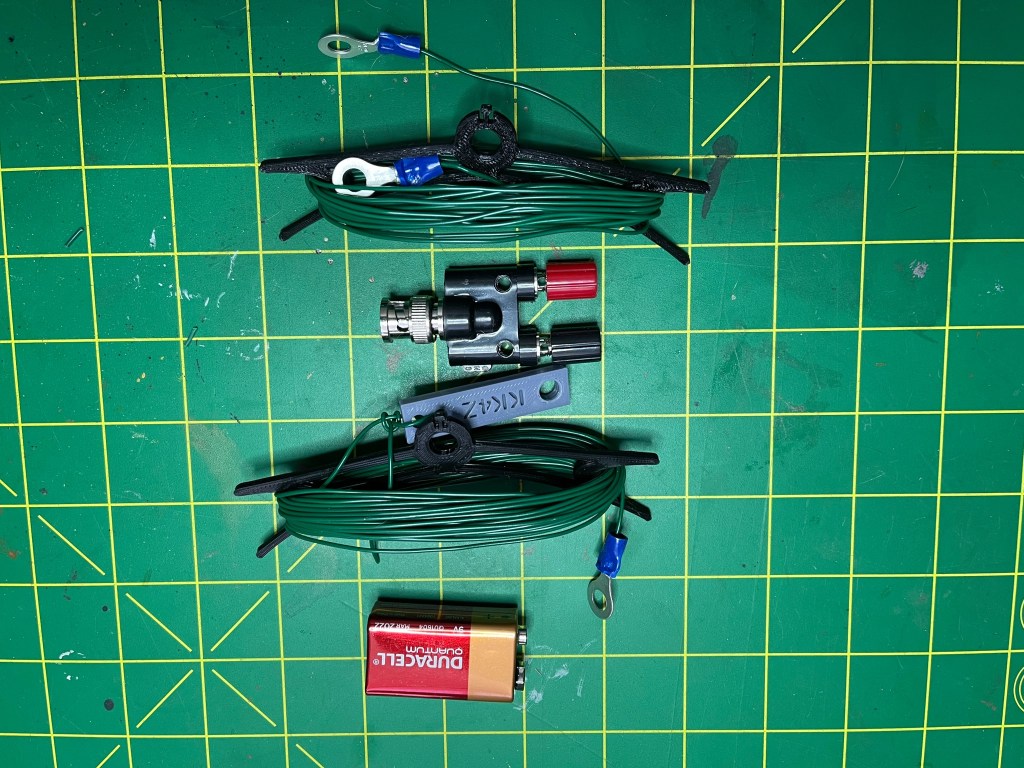
Since joining POTA, I have been more inclined to build things. I had forgotten how much fun this can be. So today, I thought I would build a couple of antennas for the outing. My first antenna will be a replacement for my speaker wire non-resonant vertical. The idea came from Thomas K4SWL using speaker wire. It was an okay antenna but it was bulky and heavier (12 oz.) than I wanted it to be.
A British company, SOTA-Beams sells some remarkably thin antenna wire. It is insulated and approximately 24 AWG. The best part is they sell a 100 meters for $10.37 and their shipping rates are reasonable. You can find it here: https://www.sotabeams.co.uk/antenna-wire-lightweight-100m/.
A non-resonant antenna is an antenna that is not resonant on any of the frequencies you plan to use. In non- resonant antennas only forward waves exist. A non-resonant antenna radiates as well as a resonant one. Here is what I started out with.
The end insulator and the wire winders were 3D printed by my son. The battery is for scale. The antenna length is approximately 28-29 feet and the counterpoise is approximately 17 feet. Putting it together was straight forward with the end result looking like this. It weighs 3 oz.
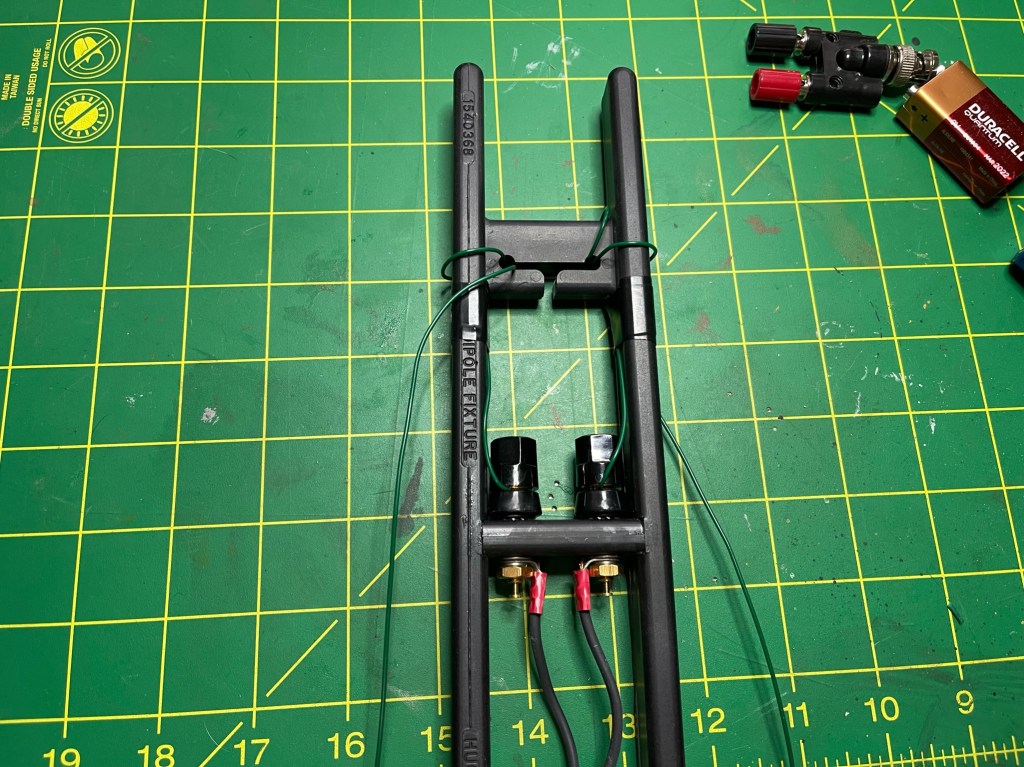
I have discovered that I like working the low bands while on a POTA activation. It takes a little more doing as the antennas get more complex and heavier. My Frankentenna can reach 160 meters but it is a pretty heavy antenna. Again, taking a clue from K4SWL, I acquired a piece of military surplus radio gear. I found an antenna winder for a dipole that is fed with 30 feet of twinlead. I got excited! A doublet is one of my favorite wire antennas as the vertical element can also radiate giving you some DX capability. It will also tune a broader range of frequencies than a dipole. Here is what I started out with.
Note that it is made by the Hughes Aircraft company. I cut the wire at 67 feet per side which should give me an approximately 132 foot dipole. I should be good to go down into the CW portion of 80 meters. While it won’t be efficient, I am thinking I can get an impedance match on 160 meters with my Elecraft T-1 or AH-705 tuner. A half wave dipole for 160 meters is about 270 feet and would be too unwieldy for the field. Getting things hooked up was straightforward.
Everything wraps on the winder. I added a balanced to BNC adapter and two 25 foot lengths of reflective cord I picked up at Tractor Supply. It all weighs 1 lb 3 oz and it all fits in a gallon size freezer bag.
There will be somewhere in the neighborhood of 5 operators at our site, so I don’t know if I will have the room to get the big antenna up. I hope so.
In case you couldn’t tell, I am a big fan of Ziplock Freezer bags in the quart and gallon sizes. They are tough, waterproof and cheap. I buy them in bulk at Sam’s Club. When one wears out, I pull a new one from the box.
Low band POTA activations can be a challenge, but not impossible. My activation at Ft Mountain State Park in GA. proved that. I am one step closer to being ready for Winter Field Day. Should be a lot of fun. It’s supposed to be cold (cold for us southerners) Night time in the mid 20’s and daytime south of 50 degrees. I’ve lived in cold climates; but, what will get me is my hands. I get pretty fumble-fingered on the paddles when my hands get cold. Thank goodnes for propane heaters. We will be operating under the callsign W4D and hopefully be turning in a log to POTA as well. Hope to hear you out there.
I had a doctors appointment in the morning so that kind of scrambled my day. I decided to attempt a quick activation using my new IC-705 with the AH-705. Today was the best day to do it because we are supposed to get some real winter weather starting tomorrow. I’m not opposed to winter weather, I do not like driving around with a bunch of folks who are. And yes, true to southern tradition, people are at the stores buying milk, bread, and eggs. Can never to too sure.
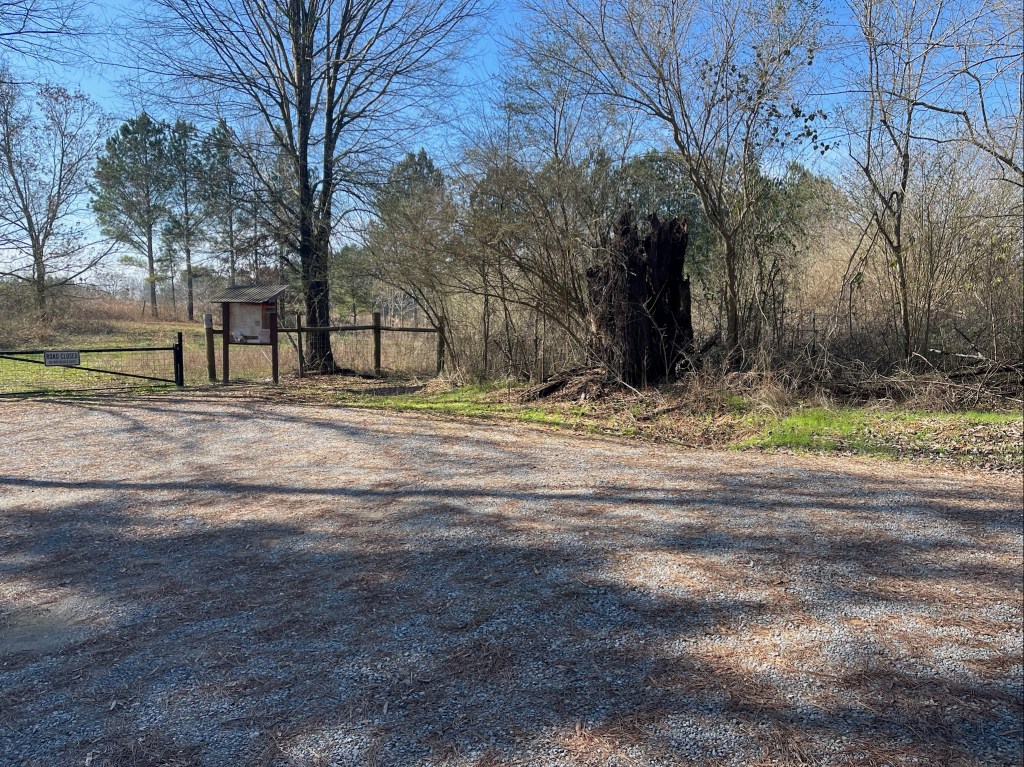
The J. L. Lester Wildlife Management Area is located in Polk County, GA near Cedartown. It is 477 acres with hunting and fishing opportunities. Even though I wasn’t hunting or fishing, I am required to have either a hunting or fishing license, or a land pass. The land pass is $30 and the hunting or fishing license is $15 per year. I became a fisherman. I parked in a parking area near the eastern boundary. I was nice and quiet.
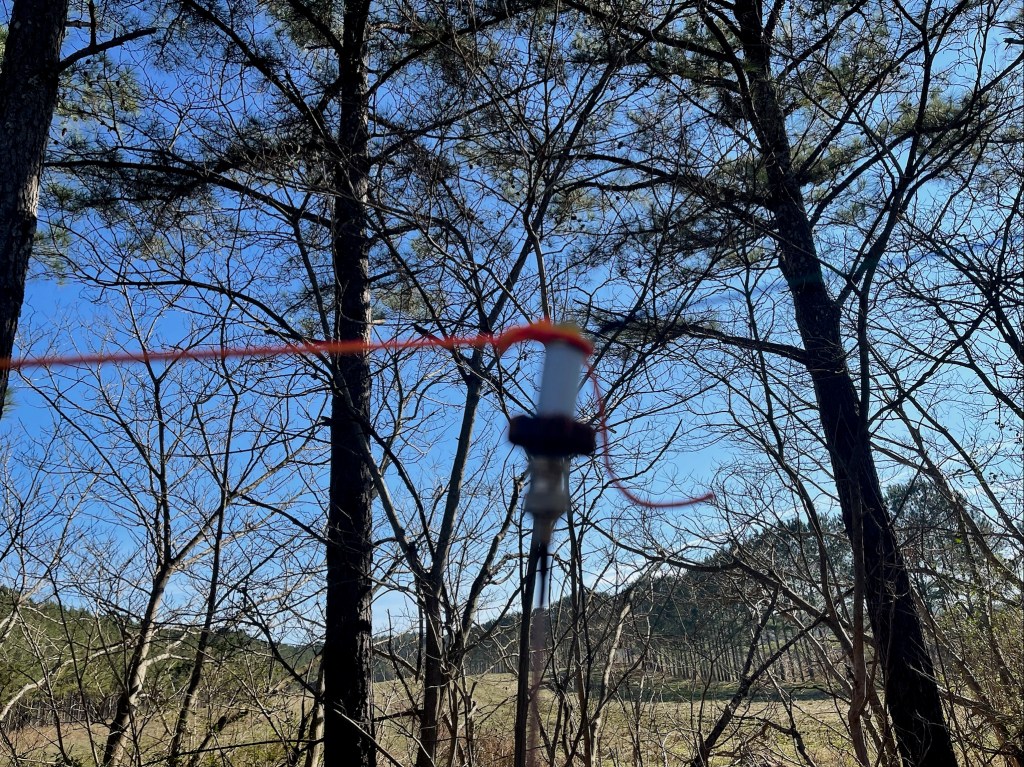
The setup was simple, the IC-705 running off of its own battery, N0SA paddles, AH-705 tuner and a Spark Plug EFHW with 65 feet of Buddipole antenna wire. The coax is RG-316. This is the first time I used the Spark Plug antenna. I hoisted the antenna wire about 20 feet up into a tree, and tied the Spark Plug off near my truck.
Here is the complete antenna set-up.
The setup in the truck was pretty simple. I used my center console desk and logged with paper. During the activation the AH-705 was on the passenger seat. Using the desk with the radio on it made it a little tipsy so for the photo, the AH-705 was a counter-balance. I will remedy this next time with a bungee cord. I had the earphones out; however, the IC-705 had enough volume for these not so good ears so the earphones were not needed.
I also discovered that I didn’t need the clock as the time on the IC-705 was easy to see.
How did everything play? Quite well actually, the AH-705 tuned the EFHW for the first time in less than 2 seconds. I was impressed. The AH-705 is more like a miniature AH-4. I have an AH-4 and it is a very capable tuner. I am looking forward to see how well the AH-705 compares to the AH-4.
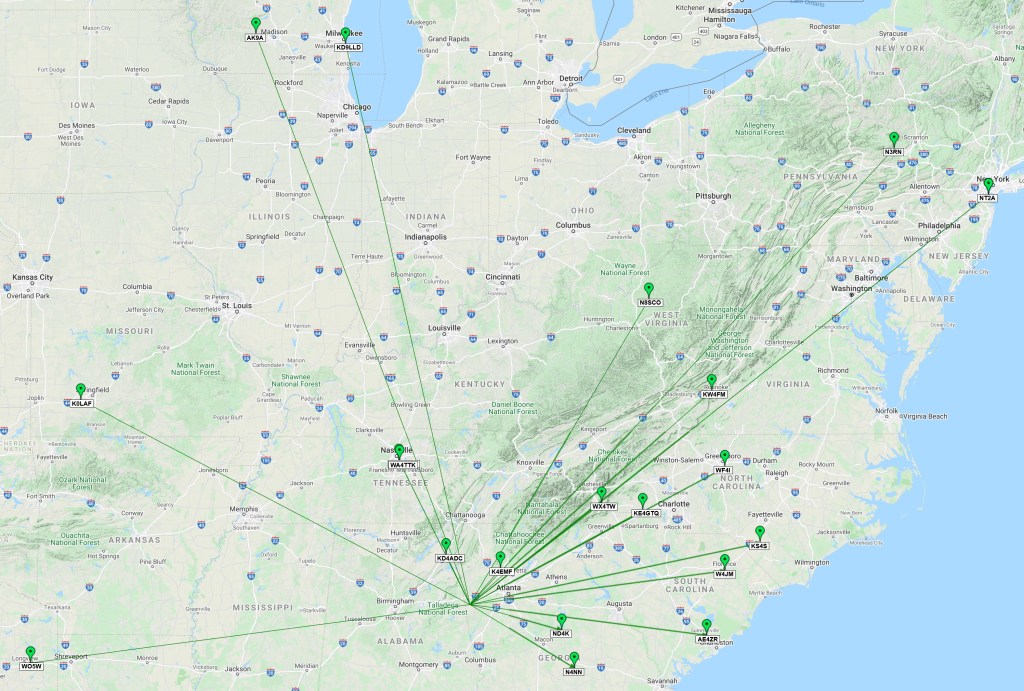
One of the reasons I brought the IC-705 was for the keyer memories. I use keyer memories quite a bit. Using memories eases the QSO workflow. I started on 40 meters hoping to get 10 activations and if not maybe move to another band. However, I had a nice pileup going on for about 35-45 minutes and ended up with 21 QSO’s. As suddenly as it started, it stopped. I called CQ twice with no answer and then pulled the plug. the antenna and 5 watts were more than ample. Here is a map of the contacts.
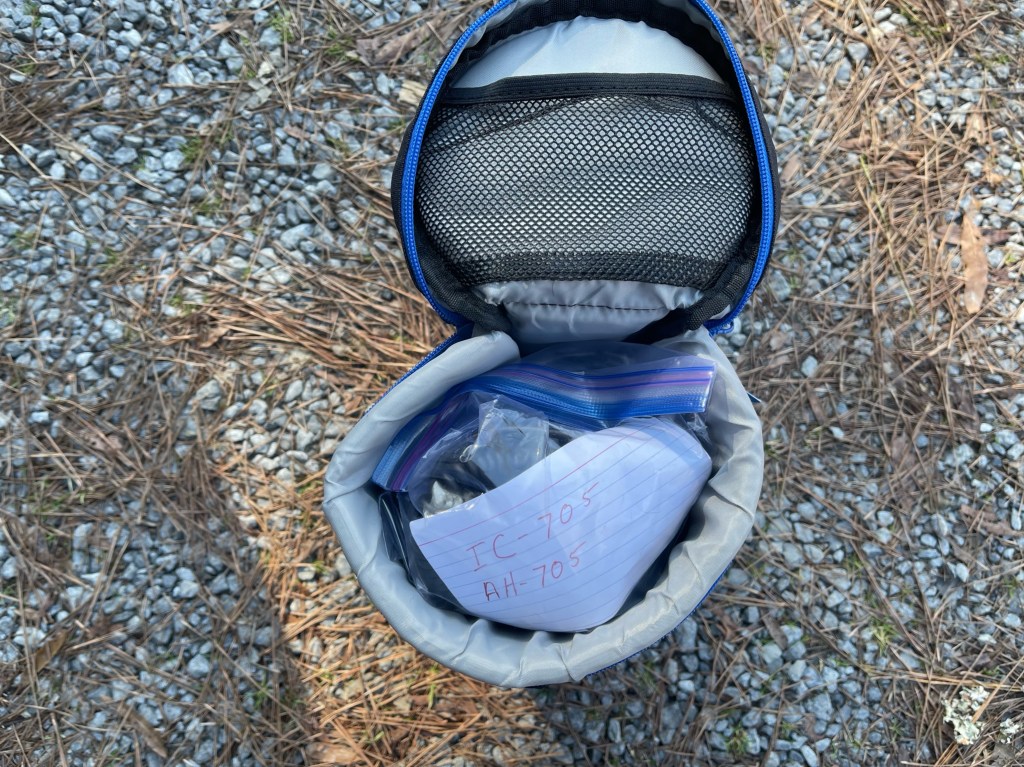
Packing up was a breeze, all my Icom stuff fits into one case. The only things that are not included is the antenna and coax.
All in all it was a great activation. It lasted just long enough and no one was left behind. I can see where the the IC-705 is moving up the ranks as my POTA radio of choice. Because I am very familiar with the Icom architecture, using it is almost second nature.
As I was packing up Marty K4JMG stopped by to say hello before he started his activation at the same place. We chatted a while and swapped a few tales. Marty and I belong to the same ham radio club. It is always good to see him.
Thanks to all those who hunted me, I enjoyed the QSO’s. See you down the log.
I bit the bullet and ordered an Icom IC-705. It really was a no-brainer for me as I already have several Icom radios. I have had other brands, but I keep going back to Icom. Anyhow, once I got the radio I needed a stand to keep it tilted at the right angle. There isn’t a whole lot out there. The commercial stands are rather pricey, and the 3D printed versions are nice but my son’s 3D printer is down for maintenance and upgrades.
I had a $30 gift card from Tractor Supply I received for Christmas, so off I popped. The stand is made from 1/16″ thick, 1″ x 1″ angle aluminum cut to 2″ long. I got a 48″ piece for 10 bucks. While there I picked up some M4 x 10 machine screws and some M4 washers (about another 2 bucks. Icom gives you the dimensions for all the mount holes in their manual.
I cut it to length, drilled the holes and then did a nice deburr on it. Needle files and a Dremel work great here. I then lightly sanded the whole piece and cleaned it with non-chlorinated brake cleaner (great stuff and cheap at any auto parts store).
The next step was a coat of primer, in this case zinc chromate, a throw back to my Army Aviation days, followed by a coat of high temperature flat black. It’s what I had on hand.
Finally, I added a clear coat and let it sit over night. Here is the final product installed on the IC-705.
It was a fun little project and only took a couple of hours time. The 705 sits back on that angled section at the back of the radio — perfect. I found a padded telephoto lens case that should fit it just fine for about 20 bucks. I’ve taken Icom radios to the field before and they hold up well. I’ve made some CW contacts from home and the radio works as well as my other Icoms. I made out to California and up into NY. I am looking forward to getting this in the field.
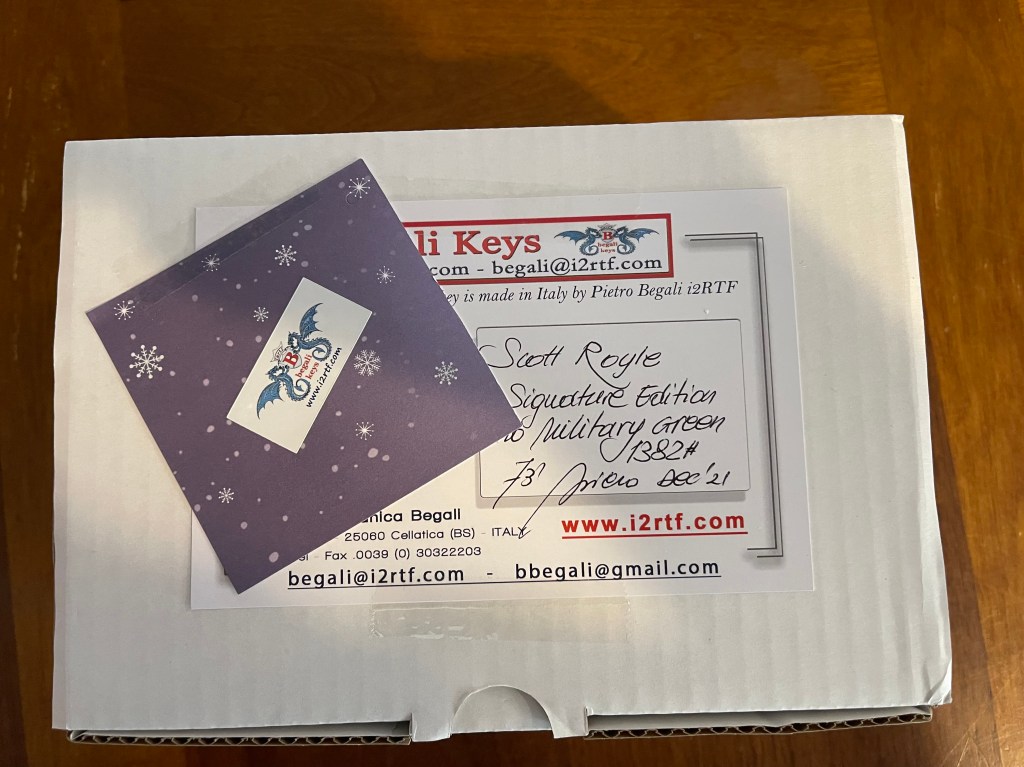
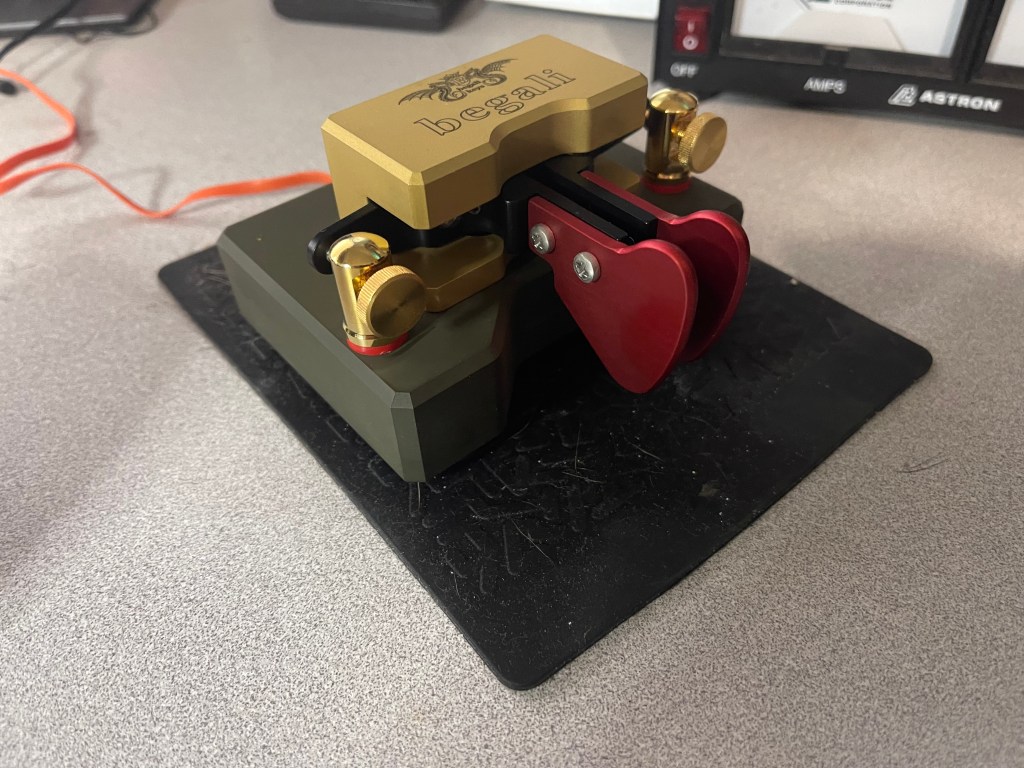
Today is a dreary day in northwest Georgia. It looks like rain and thunderstorms most of today so little or no Ham Radio. Yesterday I received a package from Italy. After waiting almost 3 weeks, my Begali Signature paddles arrived. This is no fault of Bruna at Begali, she shipped them out early so that I would have them for Christmas. However, Fedex had different ideas and the paddles sat in a Fedex facility for 10+ days before they moved. So here they are.
Even the packaging is a work of art with a note from the master himself.
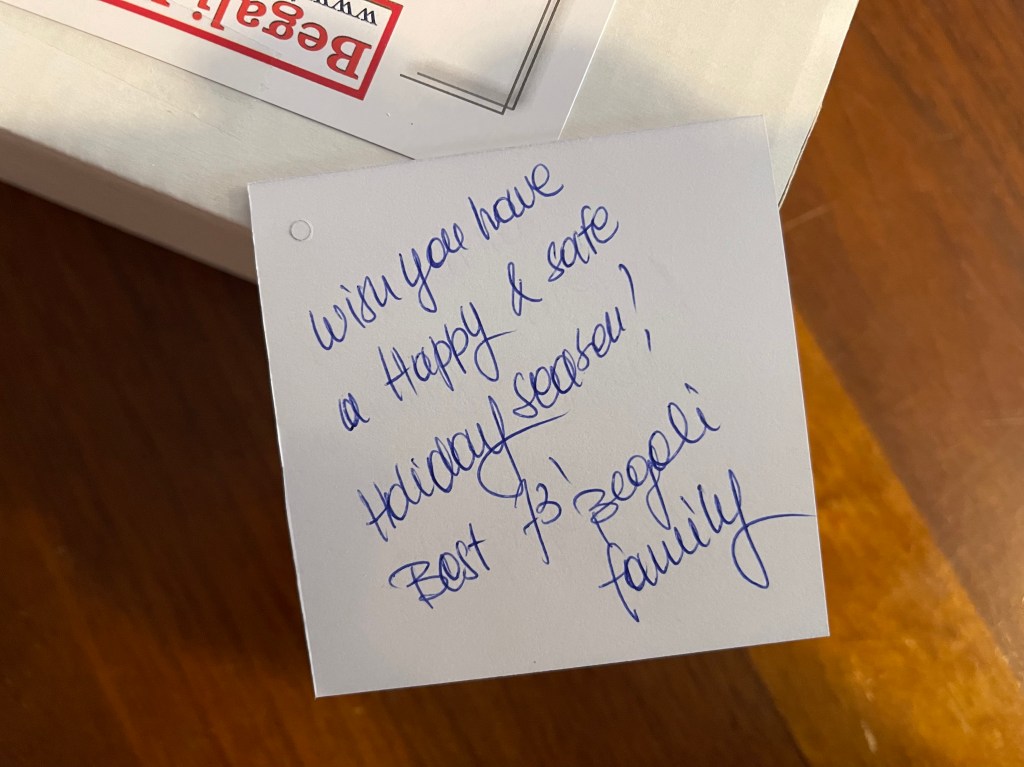
His daughter Bruna added a little holiday cheer.
To be honest, this is my third set of paddles from Begali.
So why did I choose the Signature this time? My first set of paddles were Benchers. That set up is what I call right angle arms. The contacts are to the side of the paddles and not to the rear. In my opinion they have a slightly different feel. The paddles came with the longer plastic finger pieces and the contacts screwed closed to prevent damage. I swapped the finger pieces out with the included short aluminum ones.
Adjustment was easy. I loosened the contact screws, plugged the paddles into my radio, screwed the contacts in till I heard dits or dahs, and them back it out until they stopped. No other adjustment was necessary.
The fit and finish of the paddles are typical from Begali which is excellent. I have an engineering/quality background and have an appreciation for fine fitment and finish. Begali never lets me down. Even the work on the underside is perfection. The paddles make me think of Ferrari or Lamborghini.
For the finish, I wanted something a little different. I’m from the “chrome don’t get you home” crowd. The base of the paddle is military green and the top is their titanium finish. Both are more of a satin finish rather than shiny. I like the green as I am a former soldier. The finish creates an understated elegance that is a quiet statement of quality.
How do they play? First, they are different. The action feels a little different because of the different geometry of the arms. That being said, I do not think I have ever used a smoother set of paddles. Smooth as silk or purrs like a kitten come to mind. I am no speed demon with CW. I typically run in the neighborhood of 16-22 wpm. These paddles are smooth enough to go much higher. The arms are magnetically tensioned keeping the amount of force consistent through the swing. In short, they are a joy to use and to admire. The little time I have had them and used them, they have endeared themselves to me. The now reside on my desk top and are my go to home key.
Final thoughts. The whole Begali experience is something other companies should aspire to. From their customer service, packaging, and the product itself, is all top shelf. Their commitment to customer service leaves me feeling like they made this key especially for me. Is there another Begali set of paddles in my future? Probably, but not tomorrow.