Shack Shakeup Continues

I have a stable of radios. I like radios. I have spent the past couple of years going through radios and finding the ones I like to use. I think I am getting close. In the shack, I like my IC-7610 and TS-890. They are big and all the controls I use are easy to get to. There performance is top notch. I am content.

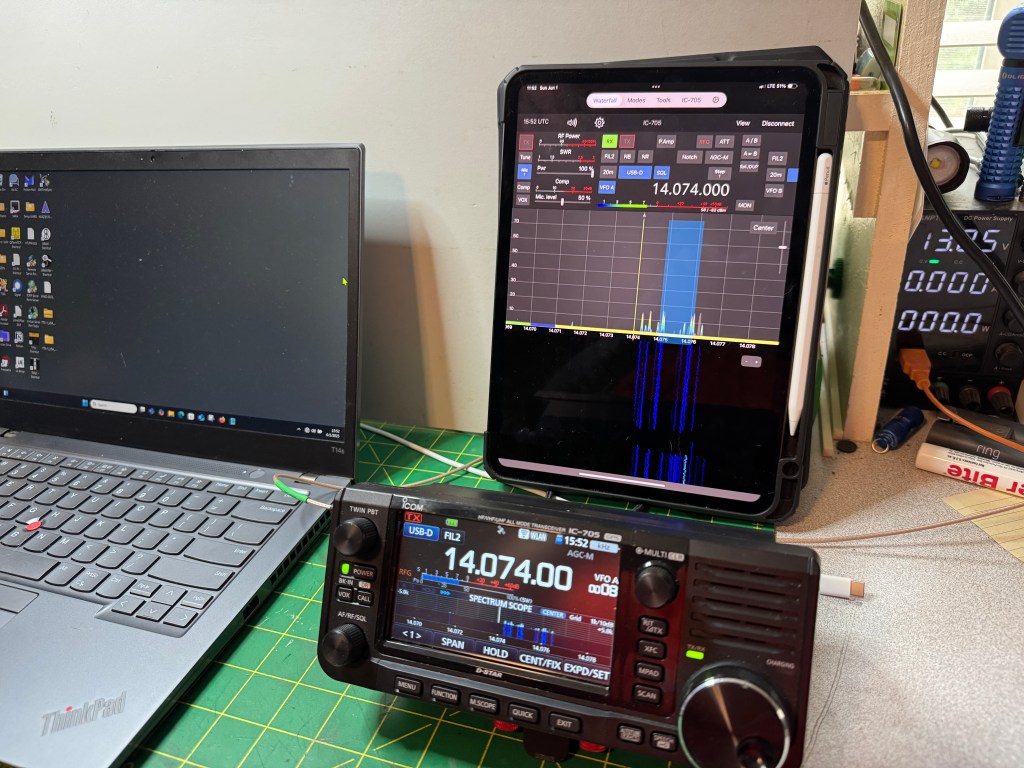
QRP radios. This has been my greatest controversy. When I retired, I thought I was going to do a lot of QRP with little radios and maybe even do some SOTA. It didn’t turn out that way. I found myself using big radios at low power. They are easy to use and because of their heatsinks, they never overheat at low power. I did keep one little radio the IC-705, of all the little radios I had, the 705 was the one I grabbed the most.

Field radios. I went through a bunch of radios here too. I kept my IC-7300 which I bought new and has stayed with me over the years. I may sell it off for the new IC-7300MK2. I recently acquired a TS-590sg which went with me on my recent POTA activation at Black Rock Mountain State Park.

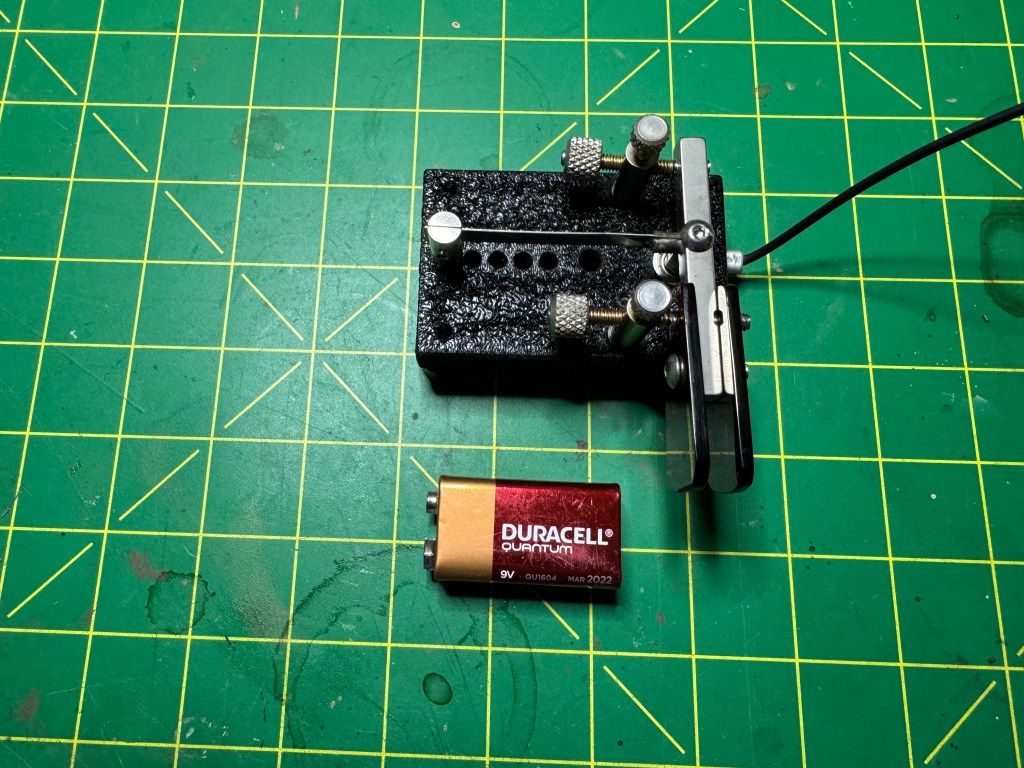
It was definitely a fun radio and I look forward to using it more in the future. Yesterday, an IC-7200 was delivered by UPS. The was a trade I had in the works. I always wanted an IC-7200. It’s a basic radio that has a military vibe to it. Being a Veteran, it appealed to me. The radio came with the rails and the MARS mod was already done. The radio is pristine. Power draw at idle is about 1 amp and at 20 watts it draws about 8 amps. Lowering the power level does not overly change the amp draw. Above 20 watts and the amp draw increases. Twenty watts is the happy medium. Here in the shack I had it turned on and was able to work N0SA. I have a set of his SOTA paddles from his last run before he retired. They are fun to use. I plan on taking the 7200 on my next POTA adventure.

During the past couple of years after making many POTA activations, Field Days (winter and summer), Army MARS, and SHARES I was able to shape how I operate. Some of it was a surprise as I was led in a different direction than when I started. I guess when it comes to radios, I may march to the beat of a different drummer. I prefer big radios (IC-7300 size) over little radios. I like that the controls are easier to get to and they don’t overheat. In the field I usually run around 20-35 watts. Most of the time I am in my micro-camper so I am not carrying the radios very far. I may have to lug them 50 feet to a picnic table. I recently bought one of those folding wagons so weight is no problem.

Another surprise was my use of FT8. Band conditions on many of my outings was poor. If it wasn’t for FT8, I may not have had a valid activation. Plus, I discovered I could work a lot of DX while in a park using FT8.

Yaesu’s. I don’t have any Yaesu’s. I have tried to like them, but they are just not for me. I had an FTDX10 for about 18 months, a FT-710 for about a year total, and a FTX1 for a couple of months. To me they are kind of quirky. The Icom’s and the Kenwood’s are solid performers and the ergonomics are superior. I know how to make them dance and sing. I know there are those who love Yaesu and I get it. To each his own. Find the radios that suit you best and enjoy them as I have. The journey is half the fun. 73 de Scott

IC-705 vs FTX1 receiver part 3

To some, this part of the test is where the rubber meets the road. For this portion I hooked both radios up to the same antenna and used an A/B switch to go back and forth between the radios. The signal source came from this morning’s CWops CWtest, a weekly one hour sprint. many of the signals are under 500 Hz apart and there are usually weak and strong signals in the mix.

I recorded about 5 minutes of the CWtest switching the radios back and forth approximately every 30 seconds. I made a YouTube video which I will post below. While I was recording I sat directly behind my iPhone so keep that in mind that my comments are from live first hand experience.

Receiver. Before the test, I had both radios turned on and attached to the antenna. When switched to the IC-705, I could hear faint CW signals even though the S-meter or the waterfall were not showing any indication of a signal. When I switched over to the FTX1, I couldn’t hear the signal. generally speaking, I feel that the IC-705 has a slightly lower noise floor than the FTX1. Both radios have good receivers and it would take an experienced ear to make use of the lower noise floor.

Filtering. I set the radios up the same: CW mode, no RF gain, DNR set to 2, filter width set to 250 Hz, and waterfall to 5K on each side. When the test started, I found a weak signal that had a strong signal next to it, approx. 300-500 Hz away. Both radios did a very good job even though both had some filter ringing. The desired signal was still clear and easy to copy. About halfway through, I swapped and found a strong signal with a weak signal nearby. The weak signal was about 300-500 Hz away. this time there was no ringing and the desired signal was easy to copy. Both radios performed about the same.

Audio. The FTX1 has more audio, that’s the best way I can put. It is louder, and sounds more full than the IC-705. To my ear, the audio port design, volume, and frequency response appear to be geared toward SSB and FM. However, the CW signals out of the IC-705 sounded clearer and more distinct. This may due to the smaller speaker acting more like a tweeter making the higher pitched CW signals sound clear. The FTX1’s CW sounded a little muffled. For me, when I operate CW I am usually wearing headphones or earbuds.

Summary. Performance wise, you can’t go wrong with either radio. If you are the audiophile type, the FTDX1 might be a better choice. CW ops might like the IC-705 better. I will post the YouTube video below once I get it uploaded.

FTX1 vs IC-705 Connectivity

This morning I wanted to explore connectivity with the FTX1 and the IC-705. Right off the bat, the IC-705 comes standard with Bluetooth and GPS while the FTX1 requires a separate purchase for each. The Bluetooth unit cost $55 and the GPS cost $70. the IC-705 has one additional feature in that it also acts as a Wifi access point to allow you to control the radio via iPhone/iPad apps like SDR-Control SDR Control Website. With this app I can operate FT8 and CW. It has message memory and logging. The Wifi on the IC-705 is not intended for internet connection.

Getting back to the FTX1, it took a little figuring but I got it running FT8 on my Windows machine. The FTX1 is so new that there isn’t any control configurations out there on apps like WSJT. A little tinkering and I got it to work just fine. Here are the setting I used.

You want to use the enhanced com port. I also ended up using a USB C to USB A cable instead of a USB C to USB C. I was having trouble getting the latter to work and it may have been something on my part to cause it not to work. I will fool with it some more later.

UPDATE: I was able to get the radio to work with a USB C to USB C cable. However, something I missed was while WSJT software will Xmit and Receive, it will not QSY the frequency on the FTX1. I tried this with FT-891, FT-991, and FTDX10 CAT Command sets in WSJT. Usually with Icom’s there is enough compatibility between the radios that the CAT setting from one model will work with another. An example would be the IC-7610, it is pretty cross compatible with the IC-7300 command set. Hopefully this will be addressed soon.

On the IC-705 you can output GPS data through the B port. This can be used for different things, I use it sync the time on my laptop when I am using one. As far as I can see this feature is not planned for the Yaesu.

The Yaesu is still brand new, I had it 2 days and there was already an update. I am sure as the product matures, more features will be added. I like the radio; it has a certain fun factor. If someone asked me today, if I could only have one, I would pick the IC-705. But that is today, tomorrow as the FTX1 is refined, I may change my mind. In between, I plan on having fun with both. 72 de Scott

IC-705 vs FTX-1 Power

In this post I will take a look at the power requirements of both radios. Again, this is not a detailed in depth scientific experiment, more in line with what the average user would do with equipment he/she may have on hand. One of the first things I did was hook the radios up to a power supply, in this case a Samlex SEC-1223BBM and I used one of those generic power meters. At idle:

That was surprising! The Yaesu uses 155% more power at idle than the Icom. One possible way to look at that is the IC-705 with a 3.3 Ah battery may have the same operating time as the FTX-1 with a 6.1 Ah battery. This makes the Icom even lighter because it needs less battery.

Next I hooked the radios up to a dummy load and Bioenno 3 Ah battery and did a key down at 5 and 10 watts to measure the power consumed. First at 5 watts.

Interestingly enough, the IC-705 is more efficient in its power usage. It is 340 mAh less than the FTX-1. Moving on to 10 watts.

The Icom again is more efficient being 240 mAh less power draw than the FTX-1. What does this mean? I think in rough terms a 3 Ah battery with the IC-705 will give you approximately the same operating time as a 6 Ah battery for the FTX-1. If you are a drive-up POTA guy, this is no big deal. If you are a remote POTA guy or a SOTA girl, power conservation may become an issue. For me, I will use my 3 Ah battery with the IC-705 and get a 6 Ah battery for the FTX-1. Note: The IC-705 with a 3,3 Ah battery weighs 1 pound less that the FTX-1 with a 6.1 Ah battery.

Now comes my first gripe with the FTX-1. The FTX-1 uses a different power connector than my other small radios. My IC-705 and my KX2 both use the same connector. Some of my other QRP radios in the past also used the same connector. Now I have to make sure I have the right connector for the radio. In the image below, the Yaesu connector is on the right. The center hole is larger than the one on the left (Icom/Elecraft).

From here, my reviews/blog post will become more sporadic as I have to get the radio setup and taken out in the field. Unfortunately for me, POTA parks are all somewhat far away and I can’t just pop over for an activation. I do have some big trips/roves planned and I will be bringing the FTX-1 with me. In general, I like the radio, it has a nice fun factor and it does some things very well. In the near future I plan on doing an a/b test with the IC-705 during a CW contest.

One thing to note is the FTX1 can use USB C to charge the batteries however it requires PD (Power Delivery) and needs 45 watts. That would mean a USB C charger similar to one you would use to charge a laptop. The IC-705 can be charged using a regular USB A to Micro USB cable. This might become important if you are trying to save wait or space.

Stay tuned de Scott

FTX-1 vs IC-705 Physicality

I decided to take a look at the FTX-1 and see how it compares to the IC-705. I now have both (I own both) so I can take a good look at each in comparison. My intention is to treat this in a similar fashion as I did for the FT-710/IC-7300. My take is not an in depth technical review but how the radios are perceived through the eyes of a user/operator. First up is the physicality of the radios.

The screens are the same size on both radios. The FTX-1 is a little wider and the IC-705 is a little thicker.

Adding the batteries seems to equalize this as the Icom’s battery is set into the radio and the Yaesu’s sticks out.

One is wider, one is thicker, handling the two radios, I would say it’s a wash.

Weight
Here there is a difference. The Yaesu weighs more. Handling the radios, the Yaesu feels heavier than it actually is. It feels like a brick.

The FTX-1 is 6.3 ounces or 17% heavier than the IC-705. with out the batteries. Adding in the batteries.

For the Icom, I added to additional batteries to bring the total storage up to 6.3 Ah similar to the Yaesu’s 6.1 Ah battery. Even so, the IC-705 weighs less than the FTX-1 by 9.4 ounces or 16.34%. Note: The Icom with a 3.3 Ah battery weighs about 1 pound less than the FTX-1 with a 6.1 Ah battery (see the next post about power).

Size wise, I feel the radios are comparable, they would both fit in a pack or box interchangeably. Weight could be an issue for some. For those doing a POTA activation carrying their radio from the car to a park bench 50 yds away, weigh will probably not be an issue. For those who like to pack it in or do SOTA, weight would be a more critical concern. For me, my days of over hill and dale are pretty much done. If I had to travel light I would turn to my Elecraft KX2.

Next up power with some more surprises de Scott

Why I didn’t Preorder the Yaesu FTX1

As information started coming out about Yaesu’s new QRP radio I was tempted to get one. However, the more I learned the less I liked about it. I have an Icom IC-705 and an Elecraft KX2 for QRP radios. My big field radios are an Icom IC-7300 and Yaesu FT-710F. I am looking for another QRP radio to do a long term review. I considered the FTX1 but gave it a pass for the following reasons.

Price. An IC-705 cost $1349.95 at HRO. The FTX1 cost $1499.95 but to be truly compatible with the IC-705, you have to add Bluetooth ($54.95) and GPS ($69.95). this brings the total to $1624.85. A spare battery for the FTX1 is $199.95. The Icom battery (BP-307) is $135.95; however, knockoffs on Amazon can be had for 2 for $59.95. I use them and they seem to work just fine. Another point are the antenna tuners. The AH-705 sells for $359.95 and can tune long wire and coax fed antennas. Yaesu chose a different path they have one tuner for coax fed antennas and one for long wire each costing $319.95 or $639.90 for both.

The optima package. It cost $1899.95 to give you a 100 watt option. To put this in perspective, you can buy a FT-710 Field for $884.95 and a FTM-510 for $499.95 for a total of $1384.90. Plus you get an antenna tuner included with the FT-710 and the 710 probably has better performance than the FTX1 on HF. As a side note, the FT-991A sells for $1229.95.

Performance. Yaesu was pretty mum about the performance of the FTX1. With the FTDX101, FTDX10, and FT-710, they touted the Rob Sherwood numbers long and loud. The only thing they said about the FTX1 was it had the same Analog to Digital Converter (ADC) as the FTDX10. ADC’s are all pretty similar in all of the SDR radios. So where does the FTX1 fall? Is it like the FT-710 or is it more like the FT-991A or the FT-891? For POTA and SOTA using SSB this is probably fine Rob Sherwood recommends a Dynamic Range Narrow Spaced number of 80 dB for contesting. For CW that number increases to 90dB. The FT-891 and the FT-991 are in the 70’s range.

My friend Thomas K4SWL who is attending Hamvention put his hands on a live FTX1. His first impression was it was much bigger than he imagined. He decided to cancel his reservation for a FTX1. Looking at how things attached to the radio, I had the same thoughts. If I am going that large, I’ll bring my IC-7300 or my FT-710F. I am curious about the current draw of the FTX1 at idle.

As folks get their hands on the radio, more details will come out. Hopefully Yaesu will be more forthcoming with information, we shall see. It seems to me that Yaesu did not listen to the QRP/POTA/SOTA community when building this radio. For sure the pricing and size seem out of whack. As for me, I am still looking for another radio to review, but at this time I will give the FTX1 a pass. 73 de Scott

Paddle Widget

I have a set of Begali Adventure Paddles. They are wonderful paddles. I have the mount for my IC-705, KX2, and desktop. Each mount works well. However, there are times when I do not have a stable platform for my radios or the paddles. At these times I usually hold the paddles in my hands. My go to handheld paddles are my N0SA SOTA paddles. I got mine from his last run. They are an excellent paddle.

I tried holding the Adventure paddles in my hand but I would cause errant dits and dahs. I first thought I would 3D print a box for the paddles–to much thought. I then thought about getting some square aluminum tubing. Too expensive. I scrouged around in my shop and found some 1″ angle aluminum. Perfect. Before I go on let me explain, that this was done with hand tools. A hacksaw, files, hand drill and drill bits. I also used a Dremel tool a little. This project is far from perfect. I never let perfection be the enemy of good enough.

Here is the piece roughed out.

The slot is where the finger guard mounts to the bottom of the paddler using a 4-40 screw. Mounted it looks something like this.

The guard extends past the end of the paddles to help protect the cable where it enters the paddle.

In use the paddle/guard combo looks like this.The guard keeps my index finger from touching the paddle lever and allows me to put my thumb below the paddle lever on the other side. It is very comfortable to use even with my large mitts.

A coat of primer, followed by paint and a clear coat and viola!, it is finished.

I will let it cure overnight and it will be ready for the next adventure. 73-de Scott

Turning FunComm to EmComm

In less than a month, Hurricane Season starts. For most parts of the country, this is nothing more than a news item. For us in the southeastern United States, it becomes a time of preparation.

Hurricanes, are an extreme force of nature. Unlike tornadoes, whose path of destruction may be a mile or two wide, a hurricane can leave a path of desolation 100 or more miles wide. Because it it so immense, it is almost impossible to describe; you have to be there to appreciate the god-like destruction.

Last month Colorado State University’s Department of Atmospheric Science, released it’s 2024 hurricane season forecast. Their prediction is for an “extremely active” season with an “above-average” probability for major hurricanes making landfall along the continental United States (CONUS)and the Caribbean.

This year they are predicting 23 named storms (aver. 14.4) with 5 major hurricanes (aver. 3.2). The probability of a major hurricane striking the east coast is 34% (aver. 21%) and for the gulf coast 42% (aver. 27%). In the tropical Pacific there will be La Nina conditions which can increase hurricane activity in the Atlantic. In addition, eastern and tropical Atlantic surface sea temperatures are warmer than normal making conditions conducive to hurricane development. The complete report can be found here: 2024 Hurricane Season Prediction

FunComm is a great way in keeping your emergency and portable comms ready. Field Day, Winter Field Day, POTA and SOTA are good ways to maintain your emergency gear. The same gear I take to the parks is what I would use during a disaster. I have been to disasters where a guy walks up to me with a handi-talkie in 3 pieces and telling me if I can help him fix his radio, he could help me. Don’t be that guy.

Do your radios work? Do your field antennas work? Have you tested them and checked their performance? Have you tested your batteries and do they work with your radio? Do you have enough capacity? How about generators? Do you have the right kind of generator? Some of these Home Depot generators will destroy a radio. Can you bring fuel to power your vehicle and generators? If there is no power in a disaster area, there is typically no power to pump gas. Make sure you have enough gas to get back out of the disaster area.

Don’t forget about your laptop. Do you have the apps you need installed on the laptop? Are they up to date? Did you sync the time before you left? Do you have a plan to power your laptop?

Where are you going to sleep? Are you going to bring enough food? Water? What about sanitation? Again, no power, no public sanitation. Do you have a list of things you need to bring? What about cash? In a disaster, cash is often king as the credit card machines run off of electricity and the Internet. Remember, if there is no cell service, those cell phone credit card swipers won’t work either. Make sure you bring small bills, as stores will probably not have the means to make change.

The way I am set up now, I could leave my QTH in about 4 hours with a stop at a gas station and grocery store. Part of the reason is I practice my EmComm using FunComm. I have been to several wide area disasters and I made plenty of mistakes, I learned the hard way. 73 de Scott

Cootie Box

Sometimes you got to go both ways. I recently decided I wanted to do more straight key stuff and I setteled on a sideswiper as my weapon of choice. However, I am still much more proficient with a set of paddles. Often when I go to the field for activities such as Field Day (both) or POTA/SOTA I use paddles. Now that I’m gearing up for the Straight Key Century Club (SKCC), I want to have the opprtunity to make SKCC contacts also. I do own one sideswiper key from KN5YB, Tom makes nice keys and I like the one I got from him very much. I did realize that the feel between a sideswiper and paddles is very close and since I have some nice paddles, why not make them work like straight keys.

To make a paddle into a sideswiper all that is needed is to short the Dit and Dah contacts together. This can be done with a jumper or my cootie cable https://kk4z.com/2024/01/26/cootie-cable/. While these work, I wanted something a little easier to switch back and forth so I came up with the Cootie Box. Inside is the cootie that makes the magic.

The circuit is very simple.

It only takes a few parts.

These can be found on Amazon:
Project Box
3.5mm Stereo Jacks
20 ga Wire
Note: 20 ga was far too big. 24 or 26 ga. would be better
SPST Switch
I also used solder and some heat shrink I had on hand.

I connect 5 wires on one of the jacks 2 for the Dit and 2 for the Dah contacts. One of each goes to the other jack and one of each goes to the switch. The fifth wire is the common. Since I had wire that was too big, after I cut away the insulation on the Dit and Dah contact wire, I separated the strands into two groups. I then cut the insulation off of the wires that goes to the switch and attached them to the contact wires.

I soldered the two wires together and then trimmed them before I attached the other tail to the jack. I used heat shrink to insulate the connections

Before you go any further, feed the one jack you finished soldering through the project box and thread one nut with all five wires and fasten the jack to the project box. Then thread the nut to the other jack with the three wire that go to the opposite jack. Do not thread the switch wires through the second nut. Pass the wires through the hole in the project box and solder them to the opposite jack making sure you have the Dit and Dah contacts wired correctly or they will be reversed (trust me on this one).

With the switch wired and soldered it should look like this.

Wire and solder the oppsite jack, put together, label the switch and Viola! Cootie Box.

It does not matter which end of the Cootie box is plugged into what – completely reversable. One thing I like about the box over the cable is I feel the box is more durable.

Here is a short video of the Cootie Box in action:

The King is Dead, Long Live the King

Yesterday, I decided to list my Yaesu FTDX10 on QTH.com. Surprising to me, it sold in a couple of hours. I got my asking price and the guy I sold it to has been helpful and communicative. The radio ships out Monday morning. 

I am going to take the money and get the KPA3A 100 watt amp kit for my K3(s). It is currently a 10 watt radio. I put the 3 in parenthesis becuase my radio is a converted K3 to the S. I plan to use the radio in the shack and for field days. I mainly do CW these days and the QSK on the K3(s) is sublime.

Speaking of CW, I recently received 2 keys from KN4YB. He is a one man shop that makes Bugs and keys. I was intrigued by his designs and bought a couple to try out.

The first one is a bug, model DL-151RA. It is unique in that it is a dual lever. It has one paddle for the dits and one paddle for the dahs. By moving the dit weights, you can adjust the dit speed from about 13 wpm up to 40 wpm. Mine is set around 16.

As you can see, the bug is rather compact. I have it sitting on a silicone pad on my desk and it does not move.

The other paddle I got is a Single Lever Paddle/Sideswiper. The difference between a single lever and a sideswiper (also called a Cootie Key), is a single lever paddle is used with an electronic keyer where the keyer generates the dits and dahs automatically. Note: I use the term paddle to designate a key that uses an electronic keyer and a key to designate a straight key. A sideswiper is more like a straight key where the dits and dahs are generated by hand movement. This model, the SL85 has a shorting bar which allows you to set it up as either a single lever or a sideswiper.

It is also a compact key. The workmanship is excellent and the prices are reasonable.

I started my journey into mechanical keys as the civilty on POTA seems to have taken a turn for the worse. Not as bad as SSB but not like it used to be. I decided to give the Straight Key Century Club (SKCC) a try. They only allow straight keys, sideswipers, and bugs, keys where the dits and dah are formed by hand or mechanically. My fascination for CW goes back to the 60’s. I thought bugs were very cool and wanted a Vibroplex. I wasn’t licensed until the mid 90’s and then chose an electronic keyer. My first set of paddles were Benchers. This is my first experience with straight keys.

I spent time with both keys to see which one I was most comfortable with. I went with keys that had a side-to-side motion as that was my experience. I was curious to see how well I could transition from paddles to straight keys. The answer is, not to bad. I think my years of using paddles has helped me with dit and dah ratios. The ratio is already ingrained in my head. Right now, between the two keys, I am doing better with the bug, which surprised me. However, I think over time and practice, I can gain some level of mastery over both.

What about my paddles? They are not going away. I can still send faster with the paddles and will probably use them for Field Days and some contests. It will take me a while to be proficient with keys. Setting up the bug is an art all by itself. So I am off to a new adventure. My code buddies will now have a new challenge as I try to improve my key skills. 73 — Scott