One of the things I was concerned about the FTX1 was how to protect its face while in transit. The Yaesu side rails which are not yet available are too large. They make the radio too bulky. Icom, when they made the IC-705 available also released a STL file so we could make our own covers which I did. Actually, I modified the file and my son printed it on his 3D printer.
The other day, I decided to check to see if someone had made a STL file for a FTX1 cover. They did! I downloaded the file and sent it to my son who printed it out for me (19 hours). The file was unmodified and fit the FTX1 to a tee. The file can be found here: Yaesu FTX1 3D Cover
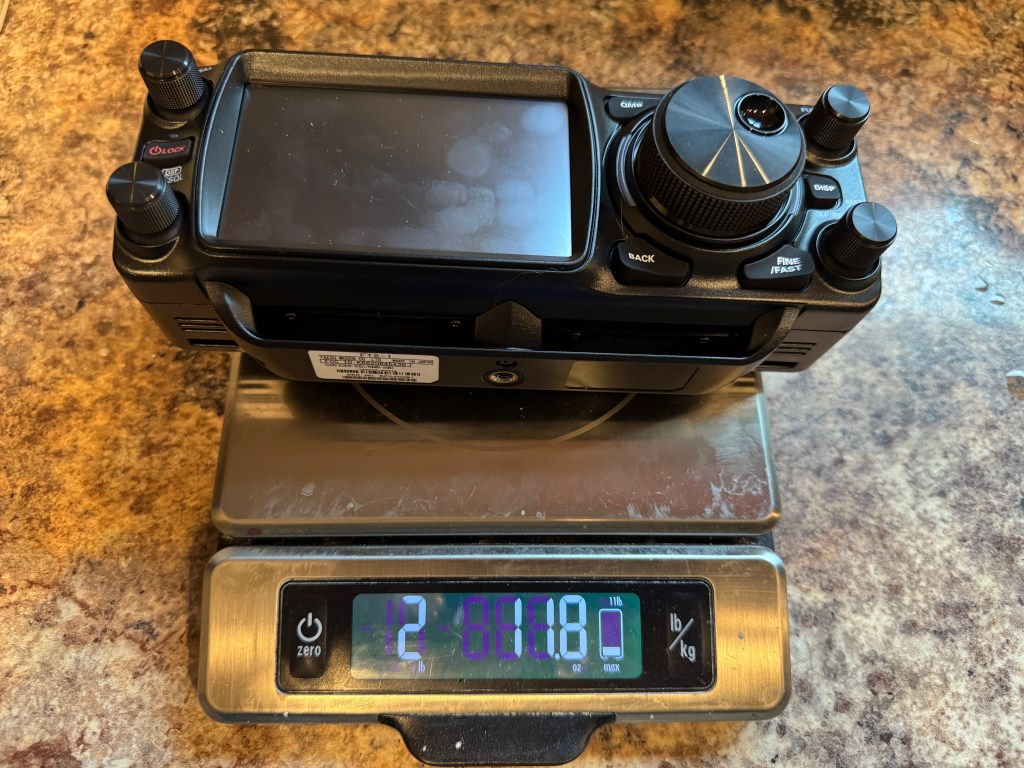
I will wrap a silicone rubber band around it to keep the radio secure in the cover. The cover weighs 6.5 oz and the whole weighs just over 4 lbs without the rubber band. For comparison, My IC-705 with cover weighs in at just under 3 lbs.
Another annoyance or at least a distraction is during CW transmit. On the FTX1 the frequency readout flashes in time to CW along with the xmit light above the main dial. It is rather bright. I shot a YouTube video showing the difference between the FTX1 and the IC-705.
Where does this leave me. Well, for one thing wondering what Yaesu was thinking. I’m not giving up on the radio, hopefully as time goes by, Yaesu will work out some of the kinks. I am a bit annoyed that Yaesu is using us as beta testers. I would expect that from a company like Xeigu which sells their radios for less than half the price of the FTX1. The FTX1 is supposed to be a premium radio at a premium price. Come on Yaesu, you can do better. I think Yaesu had an opportunity and missed the mark. As I said in a prior post, I have been very busy this summer. Hopefully soon, I will get the FTX1 out in the field. So far, as of today if I had to choose between the FTX1 and the IC-705, I would still choose the IC-705 for a QRP radio. For a full size radio, I would take the IC-7300 or the FT-710 over the FTX1 Optima. Of course, your mileage may vary. Thanks for stopping by. 72 de Scott
It’s been a busy summer for me. I had a lot of to-do and honey-do things to take care of. My wife’s best friends husband was killed in a car crash and she drove to Louisiana and helped with the arrangements. She was gone 10 days. That left me home with our special needs daughter. Not much me time.
Today I cruised over to the Yaesu website to see if there was an update for the FTx1 and there was. I was home alone and took the opportunity to update the firmware. Since I had the radio on my desk I decided to make a few CW contacts and give my new paddles from Modern Morse a try. I hooked up the FTX1 to my 270′ OCF dipole and fired up Hamrs Pro on the computer. It’s been a while since I operated and I was a little shaky, but hey, this is for fun right. I made about half a dozen contacts before I had to move on to other things. It was fun and felt good to get on the air again with CW. I am hoping to take a mini rove within the next month or two.
The radio did fine. It hears well. Probably on par with my IC-705 and KX2.The CW relays are a little loud and the screen flashes in cadence with the CW being sent. It takes a little getting used to, it can be distracting. The menus are still a little quirky, I prefer the ergonomics of my Icoms, but again it’s not a deal breaker.
The paddles are great, they are a little pricey, but I had no trouble using them. I held the paddles in my left hand and sent with my right. The action is nice and smooth. I have large hands and this paddle is larger than my N0SA SOTA paddles; they are easier to hold.
The FTX1’s audio is good once you get it adjusted. Up the treble quite a bit, up the Mid a little and take a lot out of the bass. There is plenty of volume even for us hard of hearing types.
I have some advice about computers. I mainly use Apple products for most of my computer work. I have a couple of Windows machines I use for Amateur Radio. I always hear people complaining about Windows automatically updating at an inopportune time. The solution is easy. You pick a time during the week and update manually when you or the machine are not busy. I update mine about once a week or before an event like a POTA activation or Field Day. I also don’t fiddle with the OS much. My machines run extremely well. Let them do their job.
It is hot, hot, hot here in Georgia. The heat along with the humidity can make things miserable. My eastern European blood has a low tolerance for the heat so I get my outside work done in the mornings. Everyone be careful in this heat, this time of year it can reach dangerous levels. Y’all stay safe and 72 de Scott
Dear Yaesu, What has happened? Have you forgotten us? I don’t understand your thinking when it comes to the FTX1. The FT-817 and its variants sold well for over 20 years. It is still a cherished radio and has a strong following. The FTX1 is an okay radio. It would appear to compete with the IC-705 and as I have said, it doesn’t really compare. In the realm of QRP radios the IC-705 is still better then the FTX1.
I think many of us were hoping for an improved FT-817/FT-818. The FT-817 had a nice form factor and only weighed ~2.5 lbs with a battery and antenna. The FTX1 is clunky and weighs ~4 pounds without an antenna. I still haven’t figured out the best way to carry it.
What would be a nice QRP radio? My suggestion is taking the form factor of the FT-891 and making it a 10 watt radio (20 might even be better). Replace the the 100 watt finals with a battery or a decent antenna tuner (10:1 matching?). You could even go so far as make it an SDR radio. Make a nice pouch with a shoulder strap to carry it. Most people who run QRP don’t have a need for a waterfall. Instead use the USB port to send the signal to a a tablet/cell phone/laptop to view the waterfall there. You can also allow connectivity to a tablet/cell phone/laptop for digital modes and logging. That might put you on top again.
I don’t understand the Optima option. ~$1,900. Right now, I can get a FT-710 for $955. That would leave almost $1,000 for another radio or two. The FT-710 is a better radio. I have an FT-710 and I think it is one of your better efforts. I recently used it for Field day and it did very well. I have an FTX1 and I’m keeping it for a while to see what you do with it.
Yes, I have a preference for Icom radios, they work better for me. I have had other Yaesu radios namely FTDX10, FTDX3000, FT-950 and years ago an FT-817. I also run a Kenwood. I use what works best for me. I am not necessarily bashing you, I am offering my opinion for your consideration.
Sincerely, Scott KK4Z
Note: right now I am not sure how the FTX1 fits into my lineup. As I said earlier, I think the IC-705 is better (at least for me YMMV). If I need something lighter I have a KX2. For Field Days and bigger events I can bring either an FT-710 or IC-7300. When I purchased this radio I was also looking at a KX3 with KXAT3 and KXFL3. Maybe if the right trade comes along…
Working on the farm. I have been busy on my property. I have 6 acres to take care of and there is always something to do. Right now I have to start getting firewood ready for winter. That means dragging downed trees to the process area, bucking, splitting and stacking. I have a John Deere 3025 tractor to help me out. A problem I was running into was how do I get my gear out to where I am working. The front end loader is okay to carry things until you need it for something else. Besides the steel of the bucket is not good for a chainsaw blade. In the past I would sometimes use my wife’s UTV. That has it’s own set of problems namely, she uses it for her stuff and it stays full. So I decided to build a cargo box for the 3 point hitch on my tractor. I got a carry-all from King Cutter which allows me to use my iMatch quick hitch.
I stopped by my local welder and had a 2″ receiver welded on along with some grab hooks. The finished project looks like this.
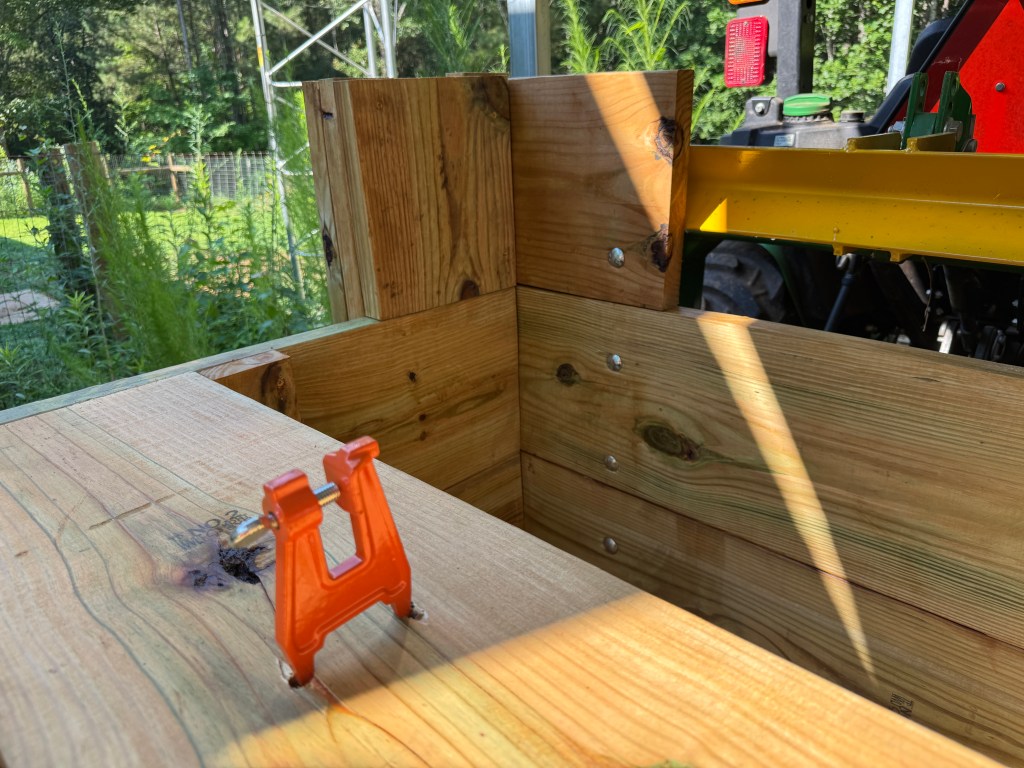
I can flip the tailgate up and turn it into a workbench.
I drilled a few holes so I can mount a chainsaw vise to sharpen my chainsaw in the field.
You can see the chainsaw sheath behind the vise. It will hold my 68cc chainsaw with a 27″ bar safely.
I use a 20′ shipping container for my maintenance shed. It’s hasn’t been reorganized since we initially filled it up almost 6 years ago. Another project is to get things in the shop sorted and non-essential stuff moved to one of our other outbuildings. I need to make it more of a workshop and less of a storage shed. There are always projects to work on.
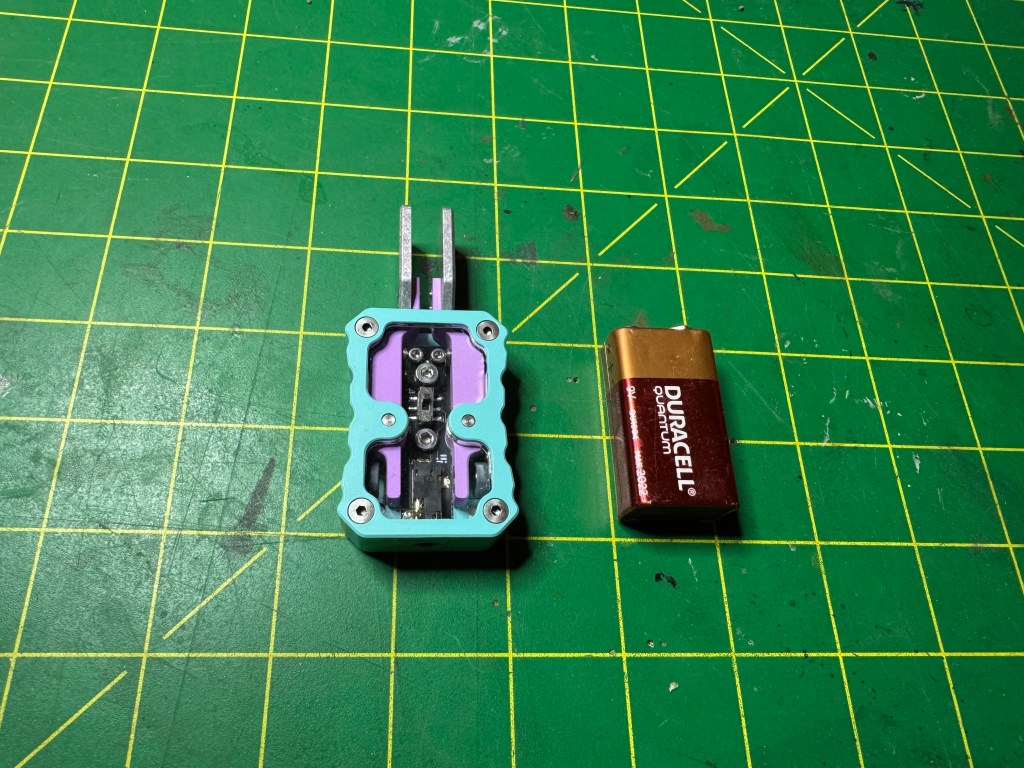
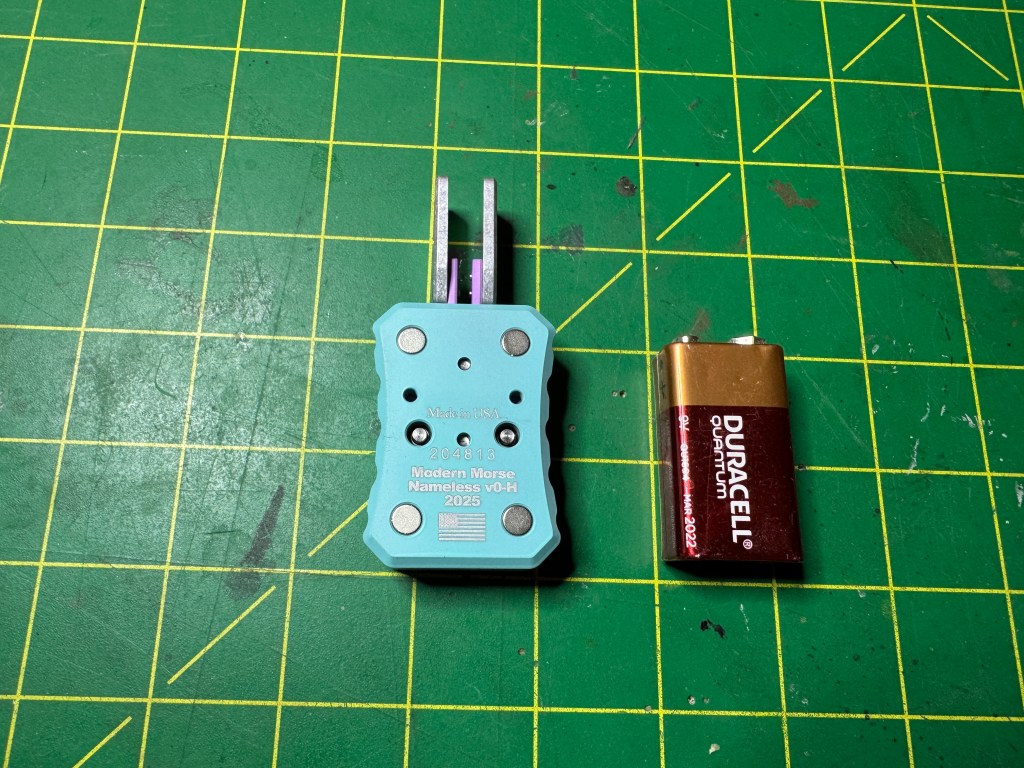
New Paddles I just received a new set of paddles from Modern Morse. I haven’t taken them out to the field yet, but in house testing shows them to be very promising. They are asy to grip, comfortable in the hand and have a very smooth touch. Workmanship is superb. The paddle body and the arms are Ceracoated and the finger pieces appear to be passivated. The arms pivot on 4 small ball bearings and tension is magnetic. There is a switch inside the paddle to switch dit-dah polarity. This is nice for left handers or “booby-footed” right handers. You can now plug and play with any radio. The paddles come in a nice metal case and two hex keys. The smaller key adjusts the tension and contact spacing and the larger one is for the 4 crews that holds the top of the case to the bottom. The paddle mechanism is sealed with a plastic lid. to get to the switch, you have to loosen the four bolts and carefully lift the top off. Be careful as there are tiny washers on the paddle arm pivots. Another nice feature is the paddles come with 4 magnets on the bottom.
The colors have a nice retro feel and are pleasant to look at. They will certainly be easy to find in a pack or on the ground if dropped. The paddles fit nicely in my hand and I have no trouble sending. These are rugged paddles designed for field use. They are made in the USA by a Veteran. The first run is sold out and there will be a pause before the next run is available. You can check the status here https://www.modernmorse.com. These paddles are pricey but if you appreciate the feel of fine workmanship, they are worth it. I am happy with mine.
Final Summer got busy and hot. Hopefully as fall approaches I will have more time to get my radios out in the field. I did manage to make it to Field Day with my club and my FT-710. I thought retirement was for leisure but I have never been busier. So much to do, so little time. 73 de Scott
I picked this up during Hamcation last year. I thought was interesting. It allows me to quickly hook up a set of power wires to Anderson Power Poles. I recently found it useful when my FTX1 arrived and I wanted to hook it up to my power supply. Ten seconds later and I was good to go. I found over the past couple of months I used these quite a few times.
My quandary was I bought it from a booth at the hamfest from a vendor whose name I couldn’t remember, how much it cost, and even what it was called. So I thought I would try to recreate it. An Amazon seach found these.
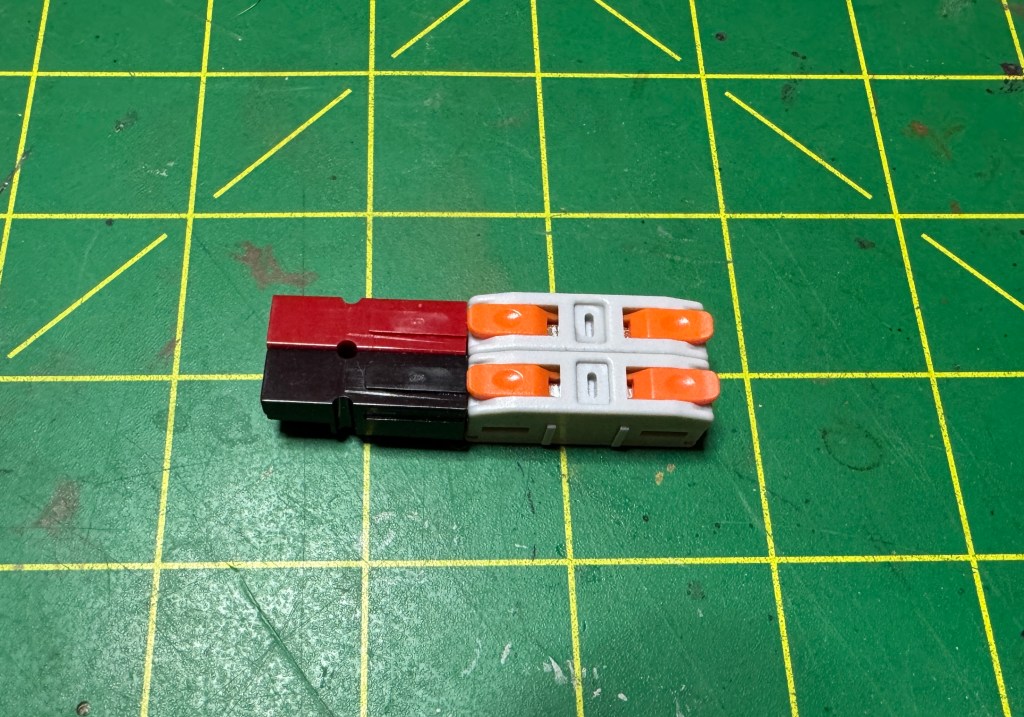
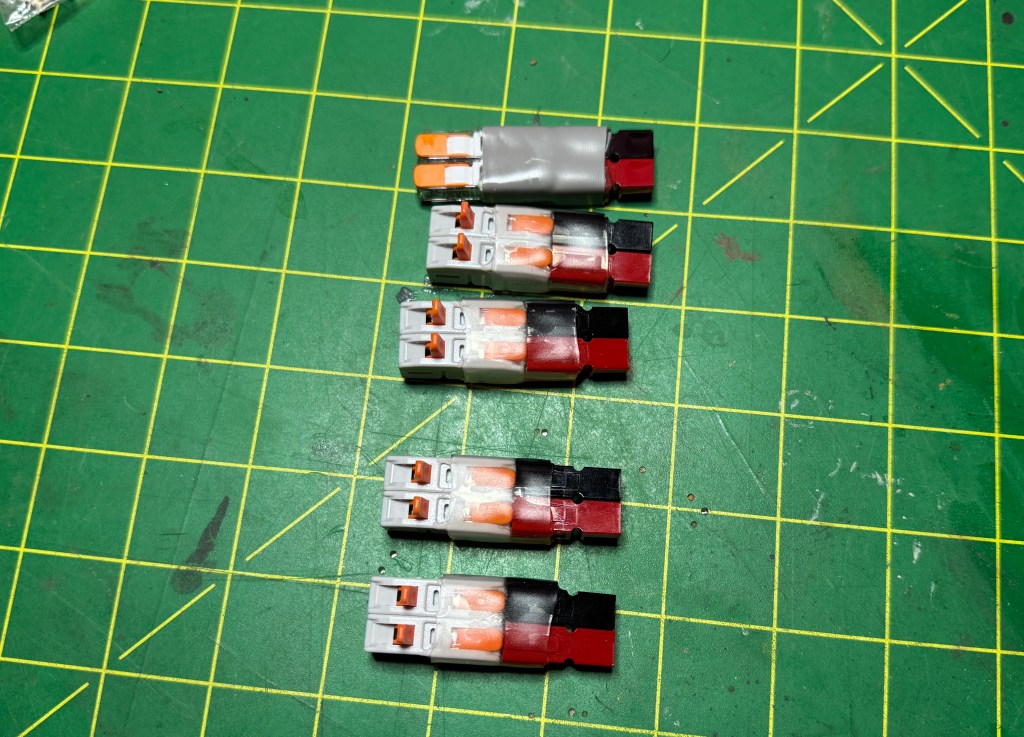
Wire Connectors Putting it together I used 1″ 12 ga. solid copper wire and standard Anderson Power Poles. These connectors will handle wire from 24 to 12 ga. Putting everything together they look like this.
From here I dabbled some Clear Gorilla Glue to hold everything together and I used some clear heat shrink from a prior project. The fnished product looks like this.
I made enough to put with my various radios. I started using Anderson Power Poles about 20 years ago when they first showed up in the EmComm community. I know folks have a love-hate relationship with them. I love them because they can prevent cross wiring an expensive radio to a power supply. Today’s pricing they are about $1.25 a set, cheap insurance.
Now if I have a friend that does not use Anderson Power Poles, I can hook him up (literally). I think I spent about 30 minutes making these. A little something to make life easier when everything around you may falling apart. 73 de Scott
To some, this part of the test is where the rubber meets the road. For this portion I hooked both radios up to the same antenna and used an A/B switch to go back and forth between the radios. The signal source came from this morning’s CWops CWtest, a weekly one hour sprint. many of the signals are under 500 Hz apart and there are usually weak and strong signals in the mix.
I recorded about 5 minutes of the CWtest switching the radios back and forth approximately every 30 seconds. I made a YouTube video which I will post below. While I was recording I sat directly behind my iPhone so keep that in mind that my comments are from live first hand experience.
Receiver. Before the test, I had both radios turned on and attached to the antenna. When switched to the IC-705, I could hear faint CW signals even though the S-meter or the waterfall were not showing any indication of a signal. When I switched over to the FTX1, I couldn’t hear the signal. generally speaking, I feel that the IC-705 has a slightly lower noise floor than the FTX1. Both radios have good receivers and it would take an experienced ear to make use of the lower noise floor.
Filtering. I set the radios up the same: CW mode, no RF gain, DNR set to 2, filter width set to 250 Hz, and waterfall to 5K on each side. When the test started, I found a weak signal that had a strong signal next to it, approx. 300-500 Hz away. Both radios did a very good job even though both had some filter ringing. The desired signal was still clear and easy to copy. About halfway through, I swapped and found a strong signal with a weak signal nearby. The weak signal was about 300-500 Hz away. this time there was no ringing and the desired signal was easy to copy. Both radios performed about the same.
Audio. The FTX1 has more audio, that’s the best way I can put. It is louder, and sounds more full than the IC-705. To my ear, the audio port design, volume, and frequency response appear to be geared toward SSB and FM. However, the CW signals out of the IC-705 sounded clearer and more distinct. This may due to the smaller speaker acting more like a tweeter making the higher pitched CW signals sound clear. The FTX1’s CW sounded a little muffled. For me, when I operate CW I am usually wearing headphones or earbuds.
Summary. Performance wise, you can’t go wrong with either radio. If you are the audiophile type, the FTDX1 might be a better choice. CW ops might like the IC-705 better. I will post the YouTube video below once I get it uploaded.
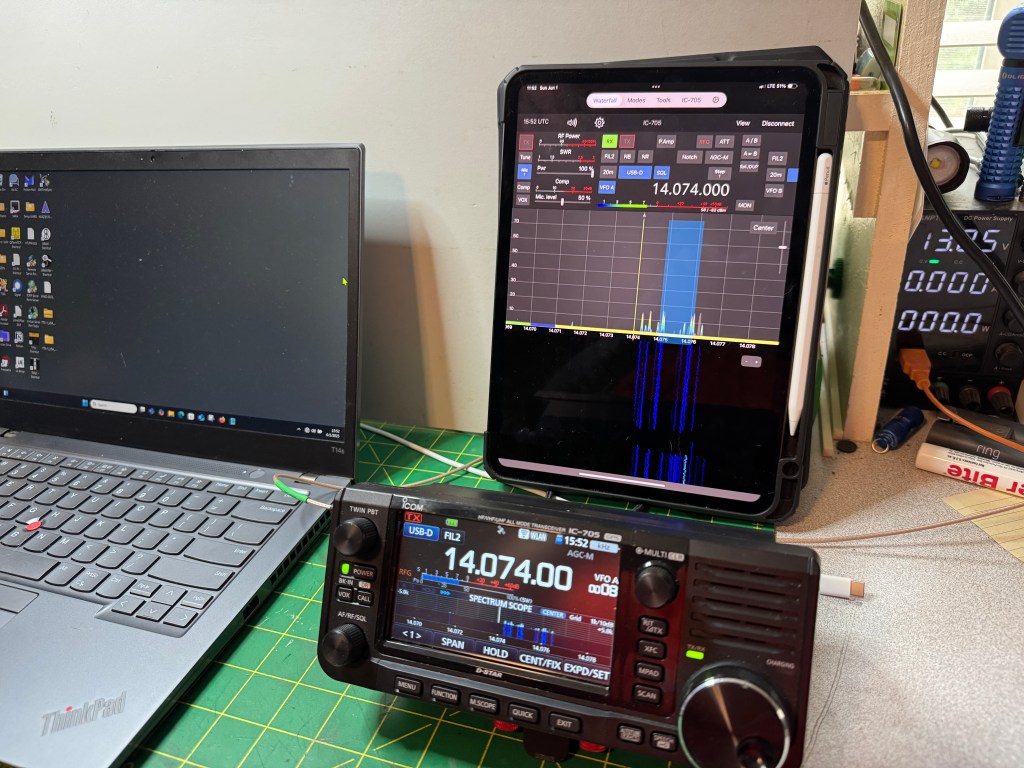
This morning I wanted to explore connectivity with the FTX1 and the IC-705. Right off the bat, the IC-705 comes standard with Bluetooth and GPS while the FTX1 requires a separate purchase for each. The Bluetooth unit cost $55 and the GPS cost $70. the IC-705 has one additional feature in that it also acts as a Wifi access point to allow you to control the radio via iPhone/iPad apps like SDR-Control SDR Control Website. With this app I can operate FT8 and CW. It has message memory and logging. The Wifi on the IC-705 is not intended for internet connection.
Getting back to the FTX1, it took a little figuring but I got it running FT8 on my Windows machine. The FTX1 is so new that there isn’t any control configurations out there on apps like WSJT. A little tinkering and I got it to work just fine. Here are the setting I used.
You want to use the enhanced com port. I also ended up using a USB C to USB A cable instead of a USB C to USB C. I was having trouble getting the latter to work and it may have been something on my part to cause it not to work. I will fool with it some more later.
UPDATE: I was able to get the radio to work with a USB C to USB C cable. However, something I missed was while WSJT software will Xmit and Receive, it will not QSY the frequency on the FTX1. I tried this with FT-891, FT-991, and FTDX10 CAT Command sets in WSJT. Usually with Icom’s there is enough compatibility between the radios that the CAT setting from one model will work with another. An example would be the IC-7610, it is pretty cross compatible with the IC-7300 command set. Hopefully this will be addressed soon.
On the IC-705 you can output GPS data through the B port. This can be used for different things, I use it sync the time on my laptop when I am using one. As far as I can see this feature is not planned for the Yaesu.
The Yaesu is still brand new, I had it 2 days and there was already an update. I am sure as the product matures, more features will be added. I like the radio; it has a certain fun factor. If someone asked me today, if I could only have one, I would pick the IC-705. But that is today, tomorrow as the FTX1 is refined, I may change my mind. In between, I plan on having fun with both. 72 de Scott
In this post I will take a look at the power requirements of both radios. Again, this is not a detailed in depth scientific experiment, more in line with what the average user would do with equipment he/she may have on hand. One of the first things I did was hook the radios up to a power supply, in this case a Samlex SEC-1223BBM and I used one of those generic power meters. At idle:
That was surprising! The Yaesu uses 155% more power at idle than the Icom. One possible way to look at that is the IC-705 with a 3.3 Ah battery may have the same operating time as the FTX-1 with a 6.1 Ah battery. This makes the Icom even lighter because it needs less battery.
Next I hooked the radios up to a dummy load and Bioenno 3 Ah battery and did a key down at 5 and 10 watts to measure the power consumed. First at 5 watts.
Interestingly enough, the IC-705 is more efficient in its power usage. It is 340 mAh less than the FTX-1. Moving on to 10 watts.
The Icom again is more efficient being 240 mAh less power draw than the FTX-1. What does this mean? I think in rough terms a 3 Ah battery with the IC-705 will give you approximately the same operating time as a 6 Ah battery for the FTX-1. If you are a drive-up POTA guy, this is no big deal. If you are a remote POTA guy or a SOTA girl, power conservation may become an issue. For me, I will use my 3 Ah battery with the IC-705 and get a 6 Ah battery for the FTX-1. Note: The IC-705 with a 3,3 Ah battery weighs 1 pound less that the FTX-1 with a 6.1 Ah battery.
Now comes my first gripe with the FTX-1. The FTX-1 uses a different power connector than my other small radios. My IC-705 and my KX2 both use the same connector. Some of my other QRP radios in the past also used the same connector. Now I have to make sure I have the right connector for the radio. In the image below, the Yaesu connector is on the right. The center hole is larger than the one on the left (Icom/Elecraft).
From here, my reviews/blog post will become more sporadic as I have to get the radio setup and taken out in the field. Unfortunately for me, POTA parks are all somewhat far away and I can’t just pop over for an activation. I do have some big trips/roves planned and I will be bringing the FTX-1 with me. In general, I like the radio, it has a nice fun factor and it does some things very well. In the near future I plan on doing an a/b test with the IC-705 during a CW contest.
One thing to note is the FTX1 can use USB C to charge the batteries however it requires PD (Power Delivery) and needs 45 watts. That would mean a USB C charger similar to one you would use to charge a laptop. The IC-705 can be charged using a regular USB A to Micro USB cable. This might become important if you are trying to save wait or space.
I decided to take a look at the FTX-1 and see how it compares to the IC-705. I now have both (I own both) so I can take a good look at each in comparison. My intention is to treat this in a similar fashion as I did for the FT-710/IC-7300. My take is not an in depth technical review but how the radios are perceived through the eyes of a user/operator. First up is the physicality of the radios.
The screens are the same size on both radios. The FTX-1 is a little wider and the IC-705 is a little thicker.
Adding the batteries seems to equalize this as the Icom’s battery is set into the radio and the Yaesu’s sticks out.
One is wider, one is thicker, handling the two radios, I would say it’s a wash.
Weight Here there is a difference. The Yaesu weighs more. Handling the radios, the Yaesu feels heavier than it actually is. It feels like a brick.
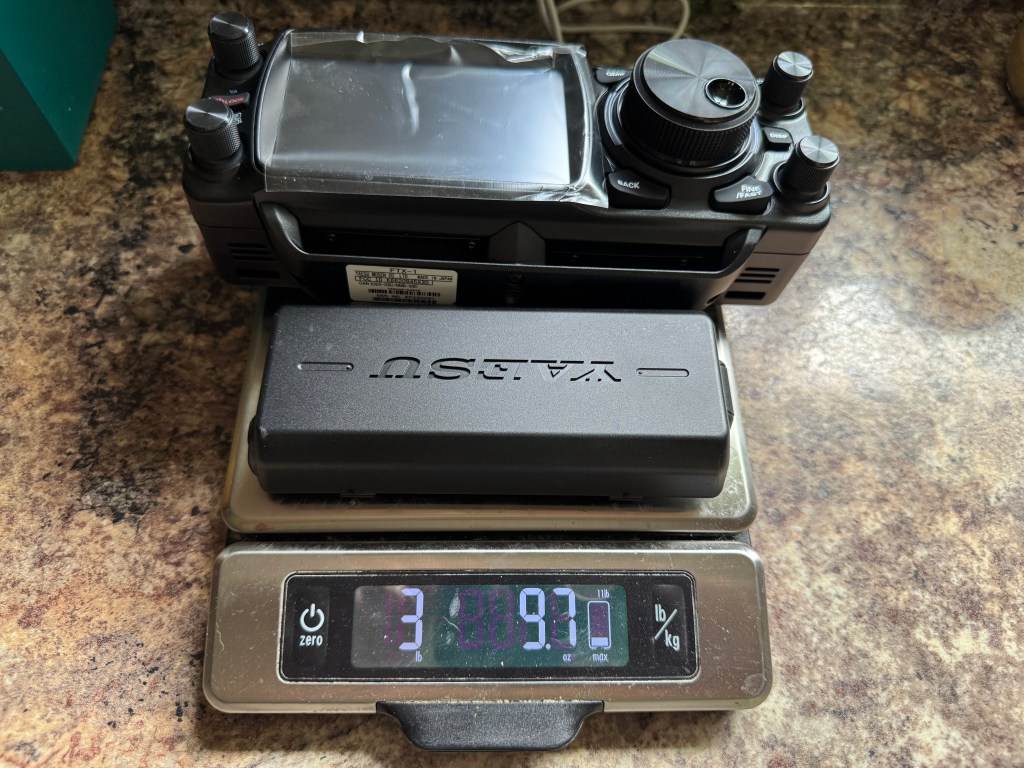
The FTX-1 is 6.3 ounces or 17% heavier than the IC-705. with out the batteries. Adding in the batteries.
For the Icom, I added to additional batteries to bring the total storage up to 6.3 Ah similar to the Yaesu’s 6.1 Ah battery. Even so, the IC-705 weighs less than the FTX-1 by 9.4 ounces or 16.34%. Note: The Icom with a 3.3 Ah battery weighs about 1 pound less than the FTX-1 with a 6.1 Ah battery (see the next post about power).
Size wise, I feel the radios are comparable, they would both fit in a pack or box interchangeably. Weight could be an issue for some. For those doing a POTA activation carrying their radio from the car to a park bench 50 yds away, weigh will probably not be an issue. For those who like to pack it in or do SOTA, weight would be a more critical concern. For me, my days of over hill and dale are pretty much done. If I had to travel light I would turn to my Elecraft KX2.
I’m not afraid to tell on myself, I can own up to it. Last night I decided to go ahead and order a Yaesu FTX-1 Field. Not without reason though. I watched a few YouTube videos from hamvention with John from Yaesu talking about the FTX-1. He mentioned that the performance of the FTX-1 would be similar to the FT-710. That could be impressive. I just finished up a review on my FT-710 so I have a feel for the radio.
Another cause and effect was yesterday, I pulled my IC-705 out getting it ready for some POTA activations. I had been remiss doing QRP CW activations focusing instead on low power digital with full size radios. I have been feeling the urge to brush up on my CW skills. Back to the 705, I like the radio a lot. It does indeed push all of the buttons. I was holding it in my hand thinking it’s not so bad for a portable radio and the FTX-1 is only a little bigger…I thought I might do another comparison series this time between the 705 an the FTX-1. I have a couple of big trips planned for the fall and winter and these radios will do nicely.
Another reason that pushed me toward the FTX-1 was the price of used radios, they are over the top right now. I was looking at a KX3 and it was the same price as the FTX-1. Even some of the other used radios were more than I cared to spend for them. One thing I forgot to mention, is I have grown used to waterfall radios. I have learned to use them to help me find places in the band to operate and to do a real time check on propagation. It’s amazing what you can glean from those screens.
Hopefully, over the next couple of months I’ll put the IC-705 and the FTX-1 through their paces. Up front I will say that I have a preference for Icom radios, but the FT-710, KX2, and TS-890s have found places here at the ranch. I am not adverse to using different brand radios, I use whatever fits me best.
The new radio should be here in a couple of days and then the games begin. This should be fun. 72 de Scott
Over the past couple of years, I have spent a lot of time taking what I call big radios to the field. These are 100 watt radios that I run at reduced power usually between 20 and 35 watts. I can run digital modes all day long on a big radio at this power and it won’t even get warm. I usually take them out for a weekend camping trip.
That has gotten a little stale, I feel I have a good understanding of how those radios and antennas work and I have made 1000’s of contacts all over the world. It’s time to do something different. I have 2 wonderful QRP radios, a KX2 and an IC-705, that haven’t seen a lot of use. I have also let my CW skills slip a little. Change is in the wind. I am planning some trips using my little (QRP) radios. in addition, I may spend a few nights in a motel rather than camp. Each day I am out, I can mini rove and do a couple of parks instead of just one. I feel the change will be refreshing, kind of going back to my POTA roots.
This fall, I am planning another multi-state rove. This will be a multi-day rove hitting a park in a state and moving on. It will be a nice drive and a lot of fun. I want to try my hand at quick set-ups and tear downs. The beauty of amateur radio is the diversity of things you can do. Sometimes, you gotta due a few things for fun. 73 de Scott