I’ve been retired almost a year now and I have enjoyed it. With retirement comes age and with age comes “stuff”. Until you reach retirement, you really don’t know what it is really going to look like. I’ve had some discoveries along the way.
Time. You think you will have time to do everything you thought you were going to do. For me this was a case of my eyes being much bigger than my stomach. Over the past year, I have been paring down my list to about a half a dozen activities, amateur radio being one of them.
Money. In retirement I do not make as much money as I used to. My wife and I are not eating Alpo, we are living quite well, but I can feel the reduced spending power. I have to give a little more thought to how I spend my money.
Age Related. Getting older means your body starts slowing down. More trips to the doctor, more preventative care, reduced ability. I led a pretty active life with 8.5 years in the U.S. Army and 20 years in the trades. I am now on the receiving end of all that wear and tear. Things hurt. I have to think more about how I do things and for how long I can do something. I still walk about 100 miles a month but power lifting at the gym is out. Coming to grips with your body not doing the things it used to do can be a humbling experience. Getting old is not for the weak.
My wife and I are spending more time taking care of each other and our special needs daughter. This means more time at home. Writing this, I am at the back side of Hurricanes Helene and Milton. I had a strong desire to go, 20 years ago I would have left in a heartbeat. Today, my responsibilities have changed. In any EmComm or disaster situation, the first rule, is always take care of your family first. It is a good rule and a smart one. It is the rule that is helping me to let go. While I may not deploy anymore, there are still things that can be done at home. I have a good home station and just added an SPE Expert 2K-FA amp which is MARS modified. I can comfortably run digital up to 1 kW. This mission hasn’t gone away, it has changed. Plus, I can still do the occasional POTA activation when I find time between all the other things I do. Stay safe and enjoy life. 73 de – Scott
The 2024 Hurricane Season started of slow but boy did it pick up steam. Right now, the country has been rocked by the devastation left by Hurricane Helene and now Florida is bracing for Major Hurricane Milton. There are lots of good people doing lots of good things out there. I want to give a shoutout to AmRRon and Grindstone Ministeries for all the work they are doing in the Tennessee/North Carolina areas. You can find out more about these organizations at https://amrron.com and https://grindstoneministries.com.
I have been blessed in that both of these powerful hurricanes missed me. Helene about 40 miles to my east and Milton several hundred miles to my south. Just because I got lucky doesn’t mean I should sit back and rest upon my laurels. Contrary to popular belief, ham radio operators in the affected area are typically not able to operate after a hurricane passes through. Their number one concern is the safety of their family and the protection of their property. Many have left the area and are holed up in a motel somewhere or are with friends/family. This is the time and the place for those not affected by the storm to lend a hand. With families and property safe and secure, amateur radio operators can travel to, set up and operate their portable stations, relaying valuable information to public safety and/or nervous families wanting to know that their kith and kin are safe.
For those able to deploy, preparations should start long before you leave hearth and home. Radios and coax need to be checked for proper operation, antennas checked for damage? Are all of your batteries charged, generators serviced, and solar panels operating properly? Is your vehicle ready: tires checked, engine serviced, lights work? Do you have enough fuel for your vehicle and your generators? Do you have a place to sleep and something to sleep on? Do you have water and do you have food? Always bring food and always bring water, regardless of what someone promises you.
And what about you? Are you in shape? When was the last time you were to the doctors? Do you have any conditions that may affect you and are they serious enough that not being near an emergency room might kill you?
I’m not young anymore and my days of traveling to a disaster areas are coming to a close. However, I am ready; I keep a running talley on my gear. How? I practice with my gear almost everytime I go to park or a campground. The same gear I use in a park is the same gear I use for a disaster. I know how it works and I know I have what I need. I call this FunComm, which to me, is practice for EmComm. My field radio stays packed and ready to go. My basic kit looks like this.
The top box contains my radio and associated gear.
The bottom box, contains my batteries, power stations and a couple of solar panels. I also have 2 larger solar panels that I would also bring. I do not always bring batteries with me for FunComm but I see that they are charged up several times a year. Two notes. 1) Check your gear. Out in a disaster, you probably won’t be able to get whatever it is you left behind. I recommend that when practicing FunComm, you go at least 20 miles away from home. That is about the distance too far to drive back home again — either make do or call it a bust. 2) Solar power generation is iffy. On a good day, a 100 watt solar panel puts out about 6 amps. Your radio at 100 watts output consumes about 18 amps. That means for every hour of transmitting, it requires 3 hours of solar power generation at max efficiency. Don’t forget, you will have to feed you laptop, lights, cell phone etc. Yes, a cell phone has other uses besides a phone. My battery box looks like this.
You EmComm types may chuff at Parks on the Air (POTA), but they know their gear, because they use it often. Take the time now. Check your gear, get it ready, get yourself ready, sometimes, when they need you, they need you now. My prayers are for those in the paths of Hurricanes Helene and Milton, and also for those souls who when the call came were ready. When the call comes, can you cry out “Here am I” 73 and God Bless de Scott
I’ve been busy lately, doing a lot of things for a lot of different people and even having fun with the process. I have been making some changes to the way I operate and how I am adapting to such things as getting older. The first change is I have added the remote VFO IC-RC28 to the shack. In the photo above, I have the RC28 next to my paddles. I like it there as I am often cruising up and down a band when doing activities like POTA. It is more comfortable with the dial being more horizontal and it is also enough out of the way when I am using my desk — well, like a desk. Just to he left of the RC28 goes my mouse. Everything right there one, two, three.
Another change coming to the shack is a new (to me) amplifier. I am getting an SPE Expert 2.0K-FA amp. This amp is capable of 1.8 to 2.0 KW of power and is set up fro general coverage (includes outside the ham bands). I normally never use more than 1 KW so what this gives me is a lot of headroom. The 2.0 is about twice as heavy as the 1.5 which I currently own. With the additional cooling I will be able to run digital modes up to 1 KW. However, I normally do not need anymore than 100-200 watts for CONUS coverage. I am adding an amplifier interface cable to the IC-7300 so both radios can each run the amp with a push of a button. The SPE Expert 1.5K-FA will be up for sale shortly.
Antennas. I’ll be putting up a new antenna. This is be a 203′ terminated end-fed non-resonant antenna. This will be a very broadbanded antenna and will allow me to operate on 60 meters. I also have some field antennas coming and I will post about them on a different post.
Power.
I added a 100 Ah battery to the list of portable power options. This battery will give me a full weekend of operating. This battery will also provide back-up power when black-outs or brown-outs occur. I have another set of solar panels on the way. This country is heading towards power shortages as fossil fuel plants are beign shut down and not being replaced. However, our energy usage is continuing to increase. Several parts of our country are already suffering from these outages.
I do have a couple of field trips planned in the near future and of course operating from home.
The wonderful thing about amateur radio is there are so many ways to enjoy the service. I do not call amateur radio a hobby as it is a service even we can enjoy it like a hobby. Until next time, get out there and get on the air, or stay at home. 73 de Scott
This past weekend I camped at Ft Mountain State Park in northwestern Georgia. One of my goals was to test NVIS and see if it would work during my stay. I collected data using FT8 from Friday afternoon when I got set up until about 2130 hrs eastern when the 40-meter band started to fade.
Conditions. I set up in the campground in Ft Mountain State Park. My elevation was approx. 2,400 feet above sea level located in a depression (-200 Ft.). The antenna was a Chameleon EmComm II ver.1 in an inverted vee configuration. The ends were 6-6.5 feet off of the ground and the apex was 10-12 feet. There was a counterpoise run beneath the antenna. The radio was an Elecraft K3(s) running FT8 at 25-35 watts.
During my stay I made 121 contacts on 40 meters. 7-8 MHz is considered the upper limit for NVIS operation. NVIS is also not guaranteed as it relies on proper atmospheric conditions to reflect the radio waves back downward. When creating the following maps, I only included states where I had 3 or more contacts. In addition, some states had no contacts and that may have been due to propagation, or no one was on at the time. Also, I reported the average signal strength for the state (not individual stations) as well as the percentage of the contacts from that state based upon 121 contacts. If you add up all of the percentages on the following maps, they will not equal 100%.
The first map shows all of the states with 3 or more contacts.
Generally, a good signal for FT8 is any signal above -10dB. A closer view shows that except for Texas the stronger signals are within 300-400 miles of the transmitting station. The circle in the map below has a radius of about 350 miles. As you can see there is a rather sharp drop off in signal strength beyond about 350 miles.
While this isn’t a proper detailed experiment, some generalizations can be made. The transmitting station was located in a depression (-200 Ft), there is a good probability that NVIS was used. The signals close in were stronger, meaning that the signals were within the skip zone and that signal strength beyond the skip zone (beyond about 350 miles) noticeably dropped off indicating NVIS operation. There were more stations contacted within the circle. As the transmitting station turned away from the sun the ability to copy close in stations diminished. The white elephant in the room is Texas. In my experience, there always seems to be a radio pathway between Texas and Georgia. Not sure why that is but in all my activations and at home there always seems to be at least one Texas station in the mix.
As amateur radio operators, we often think in terms of how far we can reach, how many miles per watt, to reach that atoll on the other side of the world. What is equally important and in some cases such as EmComm, is how close can we get. Sometimes the most important link is just on the other side of the mountain. Knowing how to utilize NVIS in your comms plans will help bridge that gap. You may be saving a life instead of collecting a QSL card. Below are some links to other NVIS posts I created. — Scott
This weekend I decided to camp at one of my favorite parks. Ft Mountain State Park. I go back a long way with this park. Thirty three years ago I spent a wonderful honeymoon there with my bride and princess. We recently spent a weekend there in the same cabin we spent our honeymoon in. Memories.
This time it’s a solo trip. I came up here for some radio adventure and I got it. On this trip, I did more EmComm related stuff. This was more like an FTX (field training exercise) than a simple POTA activation. I grabbed my normal gear and set myself some tasks to accomplish while out. I wanted to stretch my gear and me, do a grab and go like it would happen in a real scenario. I did not do any extra prep than I normally would do for a POTA activation.
My first task was to receive the National Intelligence Brief (NIB) from the Early Warning Network. I am the Communications Director (G6) of the Early Warning Amateur Radio Network (EWARN). We are building the EWARN system to best suit the needs of the Early Warning Network. This network collects information, analyzes it, and then disseminates the intelligence in products like the NIB.
Right now l receive the NIB via email and one of our projects is to be able to send the NIB to me and others via radio. We are looking at options to include using operators from AmRRon which we are developing a relationship with. AmRRon has some very talented operators. Getting back to my task, I received the NIB via my cell phone while on my way to the park. I pulled over in a gas station, connected my computer to my cell phone via the hotspot and downloaded the NIB onto my laptop.
I got the NIB ready to send over the radio. This includes formatting the document and then signing it using a PGP key. By signing the document this way, anyone with the public key can verify that the document was not altered. The document is not encrypted so it can be sent over the air. The next step is hooking up the laptop to the HF radio in my truck and sending the message. I decided to move since I didn’t think transmitting with a radio near gas pumps was a good idea so I moved. I found a pullover near the bottom of the mountain, on a road that leads up to the State Park. The radio wan an IC-7100 hooked up to ab AH-730 and a 102” whip.
Issue. I am having trouble formatting the file correctly when PGP signing the file in FLmsg. Next week I am going to get with a buddy who is a pro user and get this sorted.
I stopped, hooked the laptop up to the radio, turned it on and using VarAC on 40 meters connected to N4WXI near Birmingham AL. It took me about 2 minutes to send him the file. His group will inject it into the AmRRon system to be passed as traffic from coast to coast.
After I sent the NIB I continued up the mountain to Ft. Mountain State Park.
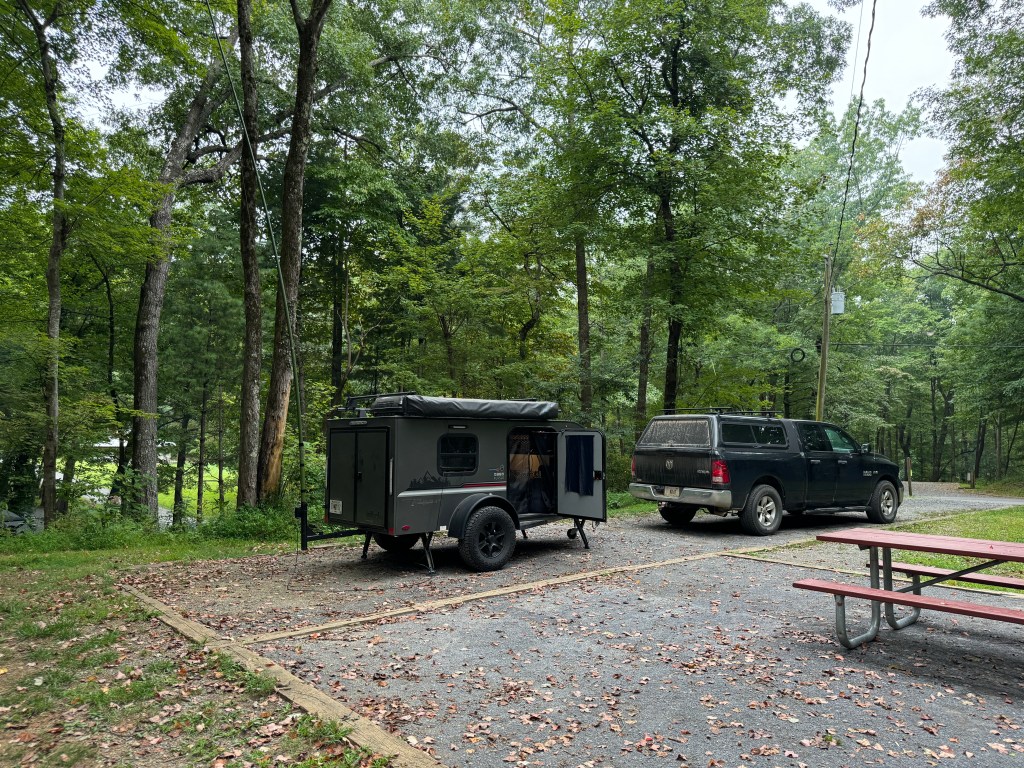
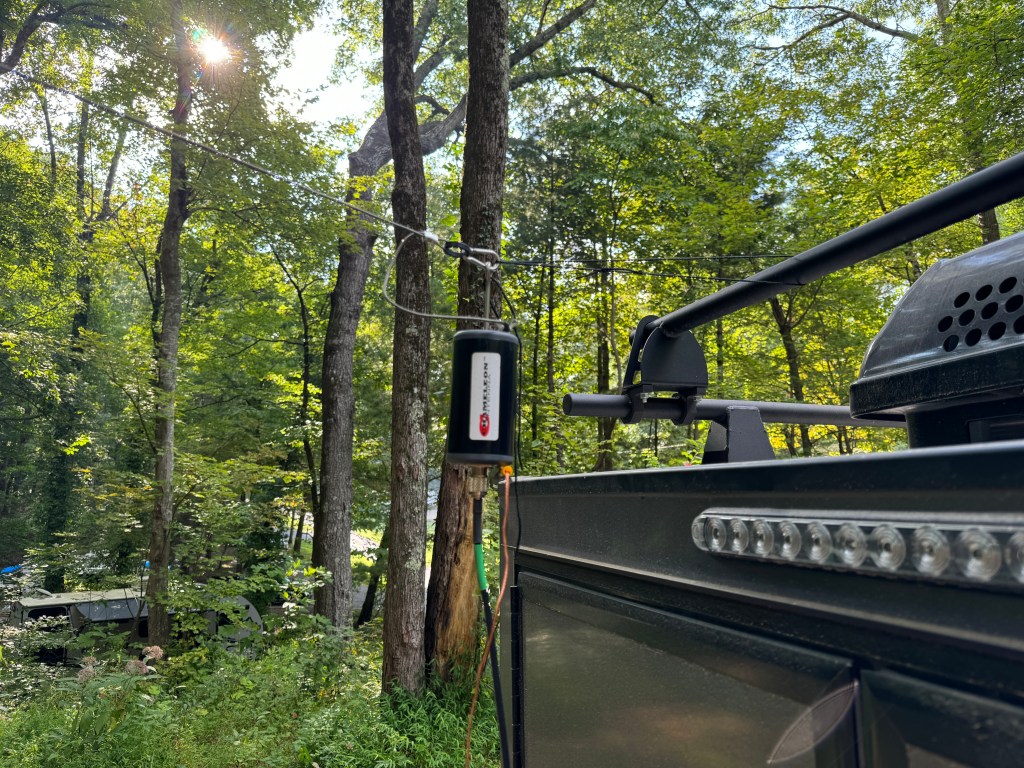
Antenna. I decided to use my Chameleon EmComm II ver. 1 for this FTX. Since I would be on the lower bands I wanted a larger antenna. I ended up configuring the antenna 3 times before I felt like I had the right combination. The first time I used my push-up pole to get one end of the antenna about 12-15 feet off of the ground and set it up like an inverted L with the counterpoise underneath the antenna. I didn’t like this version as I had power lines nearby and while I felt the setup was safe I erred on the side of caution. My second attempt was to attach the balun to the camper and elevate the center of the antenna wire in an inverted Vee with the counterpoise underneath it. I didn’t like this way because it left the counterpoise touching the camper and I didn’t want to radiate the camper. They say threes a charm and so it was in this case. I made a loop of cord between the camper and the unun which when the antenna was stretched, it pulled the unun and the counterpoise away from the the camper. The counterpoise was run underneath the antenna and this was the setup I ended up using. The radio was my Elecraft K3(s) and the laptop was a Lenovo Thinkpad T14.
Once the rest of the station was setup, I sent a quick VarAC vmail to my buddy in Alabama to make sure everything was working. My next task was to send out the NIB via Wnlink email to the regional NCS’. The equipment and the Winlink software worked fine. However, I had a fail. The note app on my phone failed to sync across my devices so I did not have all of the email address for the regions. Luckily I had two in my possession so I was at able to get the NIB out partially. One of the quirks of this campground is there isn’t any cell service. A good test of your gear and you.
Issue. App on my devices was not syncing. I am going to move my files to a better app.
After Winlink, I ran FT8 before and after the net. I did so to see if I was operating NVIS. The antenna was configured for NVIS but that doesn’t mean conditions were favorable. My initial impressions were that I was using NVIS to make many of the contacts I did on 40 meters. Forty meters is about the upper limit for NVIS. Between Friday afternoon and Saturday morning I made 121 contacts on 40. Charting out the average signal strength and percent of total contacts leads me to believe that NVIS was in use. More on NVIS in a separate post.
The net ran fairly well, I had 23 contacts and I was able to send the NIB using FLmsg. Flirig, and FLdigi. These apps worked well. The net macros worked well and need only a few adjustments. This completed another task.
FLamp was another story. I couldn’t get it to work right even though I had the most current version. I found out after the net that this version is quite buggy and I should have used the previous version. No cell service, no internet to fix it. Just like real life in EmComm. I will have to fix that when I get back home. Another issue I had was with the antenna. It does not do a good job running a digital net with above normal duty cycles. The balun would heat up causing the SWR to rise lowering the output power. If I run the net again I would probably only run FLmsg. I have a couple of other antenna options to try.
Issue. The Chameleon antenna was not up to the task of running a digital net with a high duty cycle. It would warm up, increasing the SWR. I was running 30-35 watts (I did reduce power). Further research showed that while the antenna was rated higher for Voice/CW, on digital it is only rated for 20-25 watts. This was not apparent on the website or instructions. For digital modes a rating of about 30% of PEP would be about max. My solution is to get a higher rated UnUn and derate it for digital.
Issue. Even though I had the latest version of FLamp, it was buggy and it wasn’t until I got my cell service back that I discovered that. The solution is to find an older version and install that or see if there is a patch to fix the current version.
Saturday morning the bands were in so-so shape. In addition, it looked like some weather was moving in so I broke down the station and started working on the video and this blog post. It was a nice day but I decided to go home this afternoon instead of tomorrow morning. So much to do, so little time.
Even though I’ve been doing stuff like this for 25+ years, there is still a lot to learn. Experience is only gained by doing so I leave you with a quote from Leroy Jethro Gibbs: “Grab your gear!” 73 de Scott.
Addendum. I had a total of 166 contacts. The 45 additional contacts were above NVIS and were not included with the 121 above. Here is a QSO map of all of the contacts.
This has been a heck of a year. Deaths in the family, surgeries (not mine) and other stuff has really eaten into my fun things. I haven’t gone camping as much as I would have liked and even my home radio activities were curtailed. Fortunately, life is settling down and I can branch out into fun things again. I did manage to get out during field day and went camping this month. It looks like I will squeeze a camping trip in for September and November. In October I hope to get in a few POTA activations.
I have been active with a couple of EmComm groups which is a mainstay of my amateur radio activity. I have been practicing EmComm for over 26 years. I have decided to take on a new challenge — Army MARS. I have danced around it for years, but I have never taken the plunge. I decided to give it a whirl. I spent part of my weekend modifying 4 of my Icom radios to be able to transmit on MARS frequencies. I will be starting my training soon.
This November I will have been retired for 1 year. It has been a year of adjustment. I wasn’t staring into the abyss, more like with all of the things I can/want to do, which ones do I really want to do. Yes, I was running out of time. The regimented approach where I was trying to set X amount of time a day or week per activity fell apart quickly. I decided to try a go with the flow approach by allowing myself to drift where I wanted to go. By allowing myself the freedom to pursue the activities I was most interested in, a pattern developed. So here I am.
I ended up with amateur radio at the top of the list. I also camp, write, and play the guitar. I have my chores around the property and my dogs. My dogs are a special category, as they give me love and peace. We actually started planning for retirement about 5 years in advance. It made the transition easier. Because of our planning, we should be able to stay retired. Retirement can be heaven or hell, plan early, choose wisely. 73 — Scott
This past weekend I spent some time at Florence Marina State Park US-2174. It had been a while since I had a chance to get out and I felt the need for a shakedown cruise. Peak hurricane season is just a couple of weeks away and I wanted to make sure I was ready. While most people connect hurricanes with the summer season, September is acutally the busiest month.
I usually work FT8 as a digital mode when doing a POTA activation but I wanted to test out my other modes making sure my radio system (radio, computer, antenna, etc) was in good working order.
I have been busy the past couple of months working on some projects on the EmComm side of the house and I haven’t had the opportunity to test my portable gear. In particular, I haven’t had the chance to use my Elecraft K3 with digital modes. It is a great radio so I took it and the manual with me. For EmComm, always bring the manual. My antenna was my 28.5′ random wire vertical with a 17′ counterpoise. This is a good antenna for parks as it does not put wires in the trees nor holes in the ground. Being a vetical, it does tend to be more Dx than local. If I need more local operation, I have other antennas I can use. Attached to the antenna is a homemade 9:1 UnUn and a 1:1 current BalUn. Coax was RG-8x fed into the back of the K3. The auto-tuner on the K3 is fairly wide ranging so an external tuner is not needed. This configuration allowed me to work 40-10 meters easily. My spare radio was an Elecraft KX2.
I used mains power at the campsite however, my two Honda generators will power the camper and the radios.
Band conditions were poor, you can’t pick the conditions when responding to a disaster. I booked this campsite a couple of months in advance. When I deployed to Hurricane Katrina, I had similar band conditions. You work with what you got.
I spent some time setting up the radio to run on digital, it took me about 10 minutes to get it sorted. I worked through my apps starting with Winlink. I didn’t update my propagation chart, so I had to download it via radio. I had to hunt around to find a node to connect to. Band conditions again made things difficult. I did manage to connect to a node in TX on 20 meters. I was able to get the report and send an email. Next up was VarAC. It started right up and I sent a few beacons and checked it on PSKReporter.
I had 1 bar on my cell phone and was able to get the map copied before it winked out again. Vara is a great mode and has weak signal propagation very close to JS8Call. From my experince, it is less than 1 S-unit difference.
Later that evening, I checked into one of my EmComm nets using FLdigi. Along with FLdigi, I use FLrig, FLmsg and FLamp. All worked well except that the band condtions prevented 100% copy. The rest of the time I was on FT8. the bands were up and down and the only band producing anything was 20 meters. I only made 161 contacts. On a weekend with normal band conditions I would get between 400-600 contacts. I decided to call it quits late Saturday afternoon and head home. Besides the poor band conditions, it was oppressively hot and humid. There is only so much you can do inside a small camper. Here is the QSO map for the trip.
As you can see, really strange propagation. It was almost like someone built a wall SW to NE. My antenna is normally omni-directional.
It was a good trip and I managed to check all the boxes I needed to check. if you are involved in EmComm or if you live in an area prone to hurricanes, now is the time to check your gear. For those living in a hurricane prone area, make sure you have a spare antenna, tucked away somewhere. Take it out check it and run it with your radio on the bands you think you will be using. Hurricanes can and will take out you antenna farm. Don’t forget to check out the video. Stay safe and stay ready de Scott
In one of the forums I visit there were a lot of questions about what radios and antennas to get for a new Amateur Radio Operator. I have bought/sold/traded many radios over my 29 years as a amateur radio operator and feel I have a pretty firm grip on what a basic setup would look like. I am not going to do a good/better/best list as I feel a good list will leave an operator wanting something better and a best list is usually cost prohibitive and can be technically advanced for most beginners. Better is “the just right”. This range is usually only a little more expensive then the good range and the equipment is still easy to use and has more than enough performance.
Primarily for this post, I will be concerned with Emergency Communications (EmComm). More specifically net operations using digital modes. The equipment list will be geared for either home or portable operation.
Radio. Whatever radio you choose make sure it is capable or 100 watts output and does not require a separate sound card. A sound card whether built into the radio or external is required for most digital modes used today. You want a 100 watt radio for 2 reasons: 1) The purpose is this setup is for EmComm. It may be critical for you to make the communications link with the net control station. Being able to run 100 watts even if for a short period of time is better than maxing out at 5 watts and not making the connection. 2) Digital modes have a high duty cycle. Running a 5 watt radio at 5 watts because they often have a very small heat sink, heat very quickly. A 100 watt radio can run at 40 watts all day long and not even get warm.
My choices. The radio I recommend for new hams is the Icom IC-7300 at HRO. It is easy to use and setup, has a built in sound card, and the best metering for digital modes.
With the IC-7300 you can view all of the meters at once. Runners up are the IC-7100 at HRO and the Yaesu FT-710 at HRO . I find that the FT-710 and IC-7300 (I have owned/own both) hear about the same. I prefer the ergonomics of the Icoms better. With the radio I recommend Portable Zero RailsPortable Zero Rails to protect the radio and make it easier to handle.
Antenna Tuner/Match. I recommend an external antenna tuner/match. Most built-in tuners will match the impedance of an antenna up to 3:1, and external antenna tuner such as an LDG Z-11 Pro II or LDG Z-100A which will match up to 10:1. This is important if you are using a non-resonant antenna or one that is electrically short or long.
Antenna – Home. I have used many antennas over the years and I have developed my go to antenna list. For the home station, I have settled on either an 80 meter half wave dipole (~132 ft) or 160 meter Off Center Fed (OCF) Dipole (270 Ft). I have a slight preference for the OCF and they can be had in 80 meter versions. The 80 meter dipole can be homebrewed and the OCF dipoles can be found hereBuckmaster Antennas. It is important to note that most EmComm operations happen on the 40 meter and 80 meter bands. An 80 meter antenna will work reasonably well on 40, 20, and 10 meter bands but a 40 meter antenna will not work well on 80 meter. Bigger is better.
Antenna – Portable. I have used a lot of portable antennas over the years. I have narrowed it down to 3 favorites. The antenna I probably use the most is a 28.5 Ft random wire antenna with a 17 Ft counterpoise. It is easy to set up and works well 80-6 meters. If you look at my activations on this blog I have QSO Maps to show real performance. I will include a link on how to build the 28.5′ Random wire antenna. My second favorite is a Chameleon EmComm II Ver. 1 Chameleon EmComm !! ver.2. I usually set it up as a ~60 Ft antenna in an inverted L configuration with a 55 Ft counterpoise. This antenna performs very well on the lower bands to include 160 meters. The last antenna is somewhat of a specialty. I use it for SOTA or lightweight QRP operations. It is a 40 Meter OCF dipole that weighs a few ounces Chameleon OCF 40. I hang it about 10-12 Ft in the tree and sit below it using CW. Another antenna worth mentioning is my Frankentenna which is a multi configurable antenna and I will post a link to it. along with the antenna is Coax cable. Dual purpose field/home coax, RG-8X will work just fine. For home only then you can move up to RG-213 or LMR400.
Grounding. For the home, it is a very good idea to ground your equipment. There are lots of good sources on how to do that. I run a ground rod in the ground and ground my equipment to it. When I am not using my station, I disconnect my radios from mains power, my computer, and the antenna. I also have lighting arrestors on my coax.
Power Home. I use an Astron 30 amp switching power supply for my radios. I have also used a Samlex Power Supply with good results. In the field, if I have mains power or an inverter generator avaliable I use a Powerwerx 30 amp Power Supply. What I like about the Powerverx is it uses Anderson Power Poles for the connections. I put Anderson Power Poles on everything. The main advantage is they prevent cross wiring and the destruction of your radio. If mains power is not available, I have batteries and solar panels to power my radios and laptop. A note about generators. Be very careful about what generators you hook your radios up to. Home Depot or Lowes generators (the cheap ones) are not well regulated and can damage your equipment. If your have to use one of those, run your radio through a deep cycle marine battery and use the generator to charge the battery.
Computers and software. Running amateur radio apps does not require a lot of horsepower or memory. Most Intel I-3 or I-5 processors will do fine. Celerons will work though I am not fond of them. For operating systems your choices are usually Windows or Linux. I run Windows 11 on my machines. For apps, you should have FLDigi, FLamp and FLmsg. For versatility, I use laptops. Keep your operating systems and apps up to date, don’t muck with the machine too much, and you should be fine.
Go boxes. There’s a lot of info out there about building Go Boxes or setting up your radios in a rack mount case. It’s fine until you have to work with it in a limited space – been there, done that. What I use is a Dewalt Tough System tool box that holds just about everything I need except for a laptop. Here is what it looks like.
This should be enought to get you started or at least thinking about your next steps.
Field Day, the opportunity to take our equipment to the field and test it in preparation for the “Big One”.
The West Grorgia Amateur Radio Society (WGARS) takes this seriously. We bring our radios, antennas, batteries, etc to a local park twice a year to make sure we know how to operate in the field when the time comes. But this is not the only thing we do, in fact, sometimes it becomes a much lower priority because…
We like to have fun. We like each other and we often spend a lot of time socializing with each other. We have pot-luck meals where club members and their families show off their culinary skills. This year we had some guitar playing during the off times. I can see music a growing venue in our get togethers. We had a Fox Hunt before the start of Field Day to kick things off. The kids loved it. We have some talented youth in our club. During events like Field Day we see families joing us. We have room from everyone. When we do get on the radio, the youth jump on the radio calling CQ Field Day. They do this because for them it is fun. We have no quotas, they can walk away from the radio at any time for as long as they want. If a radio isn’t manned — so what!
Our setup is evolving. Last year we lost our clubhouse and instead of finding another place, we bought an 8 x 24′ trailer that we have been modifying to suit our needs. It is great because we can have a warm (or cool), dry place to operate almost anywhere we want. We have 4 stations setup with soundproofing. It works well. We set up 5 antenna for the trailer. We have half wave dipoles for 10, 15, and 20 meters tied end to end with about 10 foot of rope in between them. We oriented these east-west. We have another antenna system comprised of 2 half wave antennas for 40 and 80 meters oriented north-south. I run a satellite station about 100 yards away with a vertical antenna. With this configuration we have little to no cross band interference.
I enjoy running the satellite station, I usally run either FT8 or CW and I am usually the only one on that mode so I can run up and down the bands without causing dupes. Like everyone else, when I want to take a break, I do.
As you can see, we are somewhat laid back, go with the flow kind of folks. Because we look at our club light-heartedly, we have little drama. I can’t think of a better club I would rather be in.
On yeah, so how did I do? I only have my log as the rest of the club was still operating when I left. Throughout Field Day we would have members come and go; operate a little, eat a little, talk a little. Band conditions were funky. At times QSB was rather sudden, often within an FT8 exchange. I operated well into the night, which I often do during my outings. I stayed up until 0200 hrs Sunday morning and was rewarded with 148 contacts to include 2 from Hawaii, 1 from Alaska, 1 from Luxemburg, and 1 from Dominican Republic. I made as least one contact in all but 10 sections in the Continental United States. I enjoy seeing how far my radio can reach. Below is a QSO map and below that a link to My YouTube video. 73 – Scott