Cha-Cha-Cha-Changes

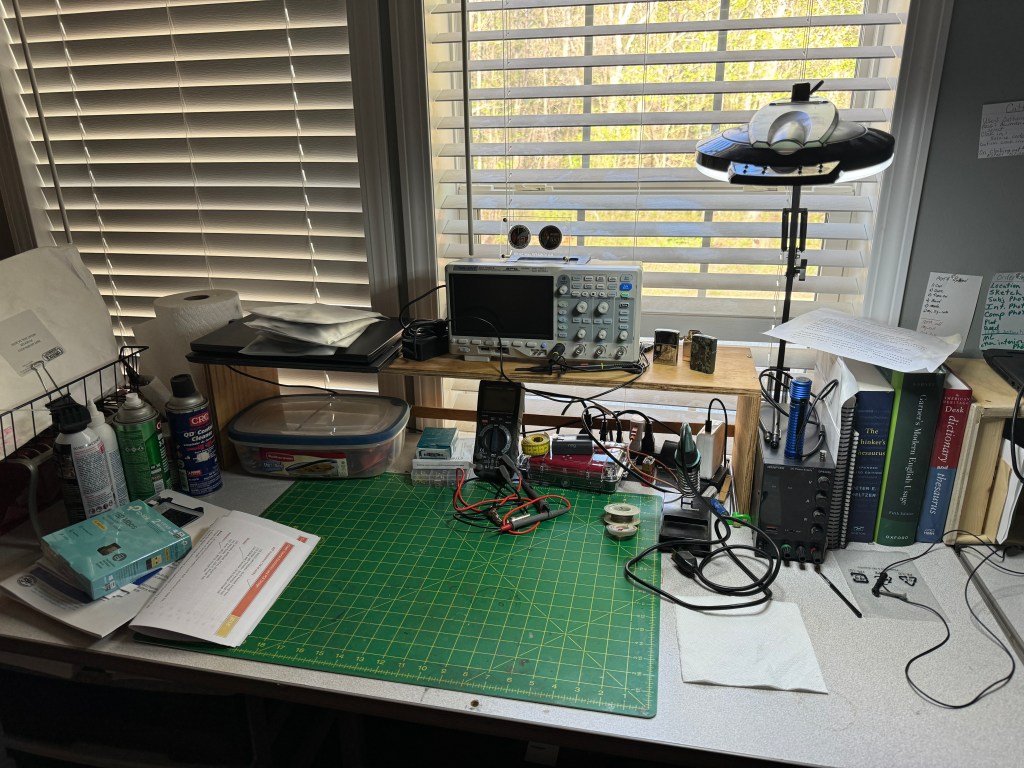
Change is inevitable. In this case my workbench. As I branch out into other fields of study my requirements for a workspace change. As I said earlier, I want to take the time and learn more about electronics. I’m not sure what I am going to do with it once I learn it — but that’s a story yet to tell. I recently added an o’scope to my quiver of test equipment. As I progress, there will be more to add. Looking at my current workbench (above) it was getting crowded and adding more equipment will quickly bring it to overflowing. Time to put on the thinking cap.

My first consideration was how to create more desk area. Horizontally, I am at my max so vertical was the only diredtion left. I decided I was going to build some shelving. I made a rough sketch and then took a trip out to my sheds. Using a mish-mash of plywood I was able to salvage enough from my scraps to build the shelves. The sides are 3/4″ CD plywood and the shelves themselves are 1/2″ premium grade. The shelves are 3′ wide and 12″ deep. vertical spacing is 8″ – enough for most test equipment. Some of the dimensions are a little off due to some warping of the plywood, but in general, the shelves are level and the whole unit does not wobble. Each shelf has a 1/4″ lip and the bottom of the shelf has a 2″ piece of plywwood across the back to prevent things from rolling where they shouldn’t. The shelf was glued, screwed and nailed using stuff I had on hand. The only thing I had to buy was some paint as all the stuff I had was dried out (I did look). I had to move my light to the other side of the bench so it would reach the work area. Fancy tools for this project included a table saw and a finish pneumatic nailer. The table saw is a godsend as it can quickly dimension lumber.

In the picture below, you can see that I now have more space with room to expand my test equipment. I believe next up will be an Arbitrary Waverform Generator with a Frequency Counter.

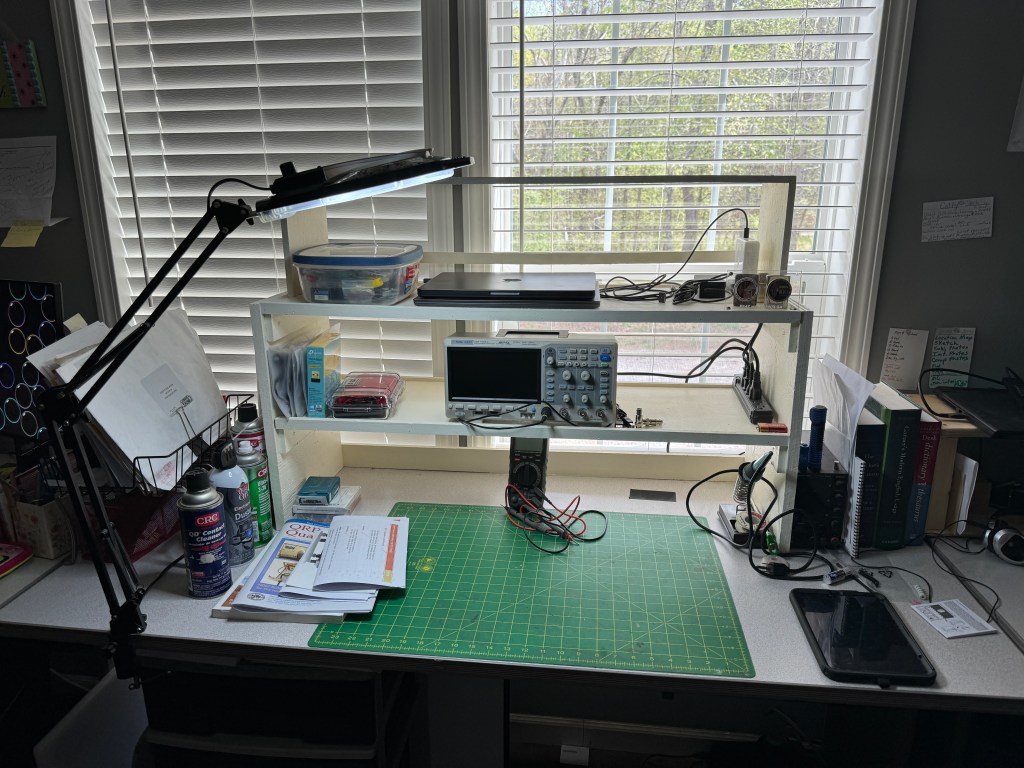
The third shelf was the original shelf shown at the beginning of the post. It was painted and repurposed. I will probably store my laptops up there.

Because the shelves are open in the back, they still let a lot of light in. I haven’t gotten my parts from DigiKey yet so the building/experimenting part is on hold. However, I am pressing forward with the written/video portions of my class.

Thanks for stopping by and checking out my (mis)adventures. When time permits I try to get on the air for a little CW fun. First quarter 2024 has been real busy, hopefully it will smooth out. Unitl next time 73-Scott

O’scope O’my

Today I decided to muck around with my Arduino Nano. I plan on utilizing it with ham radio projects. The Nano comes with a basic program that makes an LED blink. Kind of like a self test. The program starts as soon as the Nano is plugged in. While staring at the light I thought about hooking up the Nano to my oscilloscope. The scope is brand new to me and I thought it would be an opportunity to twist a few knobs and push a few buttons. Watching the Nano blinking along side the o’scope made me think it was a good visual how the o’scope takes a dynamic signal and portrays statically.

An o’scope takes a snapshot of a moment in time. It measures voltage over time which is why the blinking light was a good example. The o’scope shows power coming on and then one second later, going off. For this sinple example we can answer the following questions: Does the Nano output full voltage? Does the Nano switch states or “blinks” at the proper interval. Is the Nano consistant (blinks approx. at the right time and at the right voltage)? There are a lot of tools and techniques not covered in this short post. I wanted to share a simple discovery about what an o’scope can do without a lot of technical stuff , just a little fun. 73 – Scott

New Adventures

I’ve been retired now for a little over 4 months. It is a life changing experience. I am finding that I now have time to pursue the activities I’ve always dreamed of. I am an intellecturally curious person and if left unchecked, I could assemble hobbies and interests like the Borg. The downside of retirement is I am now on a fixed income. I’m not eating Alpo or living in a box, but I have to be a little more careful about what money goes where. Inflation hasn’t helped either. In my quest to utilize the time I now have and remain fiscally responsilble, I started looking for things to do closer to home.

After going down multiple rabbit holes, I decided to stick with amateur radio as my main hobby. It has served me well for almost 30 years and I see no reason to abandon it now. So instead of making a hard right into a new hobby/activity, I decided to take a gentle curve instead. My new interest is learning more about electronics. This isn’t really new, in the early 80’s, I bulit a Heathkit HW-8 QRP transceiver. I was in the Army and built it before I got my license. Unfortunately, I PCS’d to Germany and it wasn’t unitl the mid 90’s that I finally got licensed.

Back to today. I am still active in amateur radio and recently completed a CW Innovations course. I enjoy CW and portable operations when I can get out. In the meantime, I want to expand my knowledge of electronics with the possiblity of troubleshooting, repairing and building electronic projects. I worked many years as a mechanic/electrician and have a good skill set when it comes to troubleshooting. In other words, I like to tinker. The best definition of tinkering I have found is: Tinkering is what happens when you try something you don’t quite know how to do, guided by whim, imagination, and curiosity. When you tinker, there are no instructions—but there are also no failures, no right or wrong ways of doing things. It’s about figuring out how things work and reworking them. Contraptions, machines, wildly mismatched objects working in harmony—this is the stuff of tinkering. Tinkering is, at its most basic, a process that marries play and inquiry (Banzi, Massimo; Shiloh, Michael. Getting Started With Arduino . Make Community, LLC. Kindle Edition).

So where am I in my tinkering process. I found a course on Udemy.com called Crash Course Electronics and PCB Design. It has a huge amount of videos and other info. What caught my attention was it was on sale for $20. I’m going through the course and so far it’s pretty good. Well worth $20. Next, I ordered the components suggested for the course. I will do this in stages as the course progresses. I also treated myself to an oscilloscope. It’s amazing how much o’scope you can get for the money. I settled on a Siglent SDS1104X-E 4 channel. It should meet my requirements now and in the future. I will be adding more test equipment as time (and money) allow. It will be a slow process and I will have to temper my inpatience. Yesterday I did some cleaning up of my workstation and it now looks like this.

I have a copy of Make Electronics 2nd Ed, which I will use in conjunction with my other course, and I bought an Arduino Nano with the Getting Started with Arduino book from the Make people. I feel in todays world, microcontrollers and electronics go hand in hand.

As always, I’ll bring you along for the ride as I venture into new territory. I may even try working on an old radio to see if I can get it to work. 73 — Scott